This site contains affiliate links. As an Amazon Associate, I earn a commission from qualifying purchases at no extra cost to you. Full Disclosure Here.
So you’ve decided to make your own ghillie suit. Great! There’s always a sense of pride in things you build yourself! One major advantage to building your own suit is that you can perfectly tailor it to your exact Area of Operation (AO), and blend in seamlessly with your immediate surroundings. This quick step-by-step guide to building your own ghillie suit is a great baseline, but you may want to add/change some things to better suit your environment as each and every AO is unique and will have its own set of needs to blend in correctly.
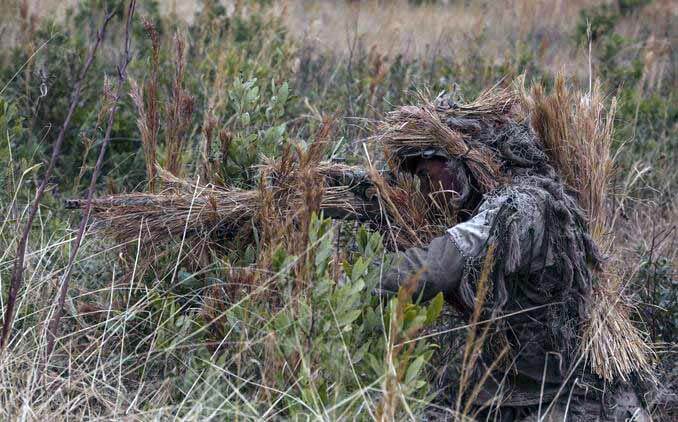
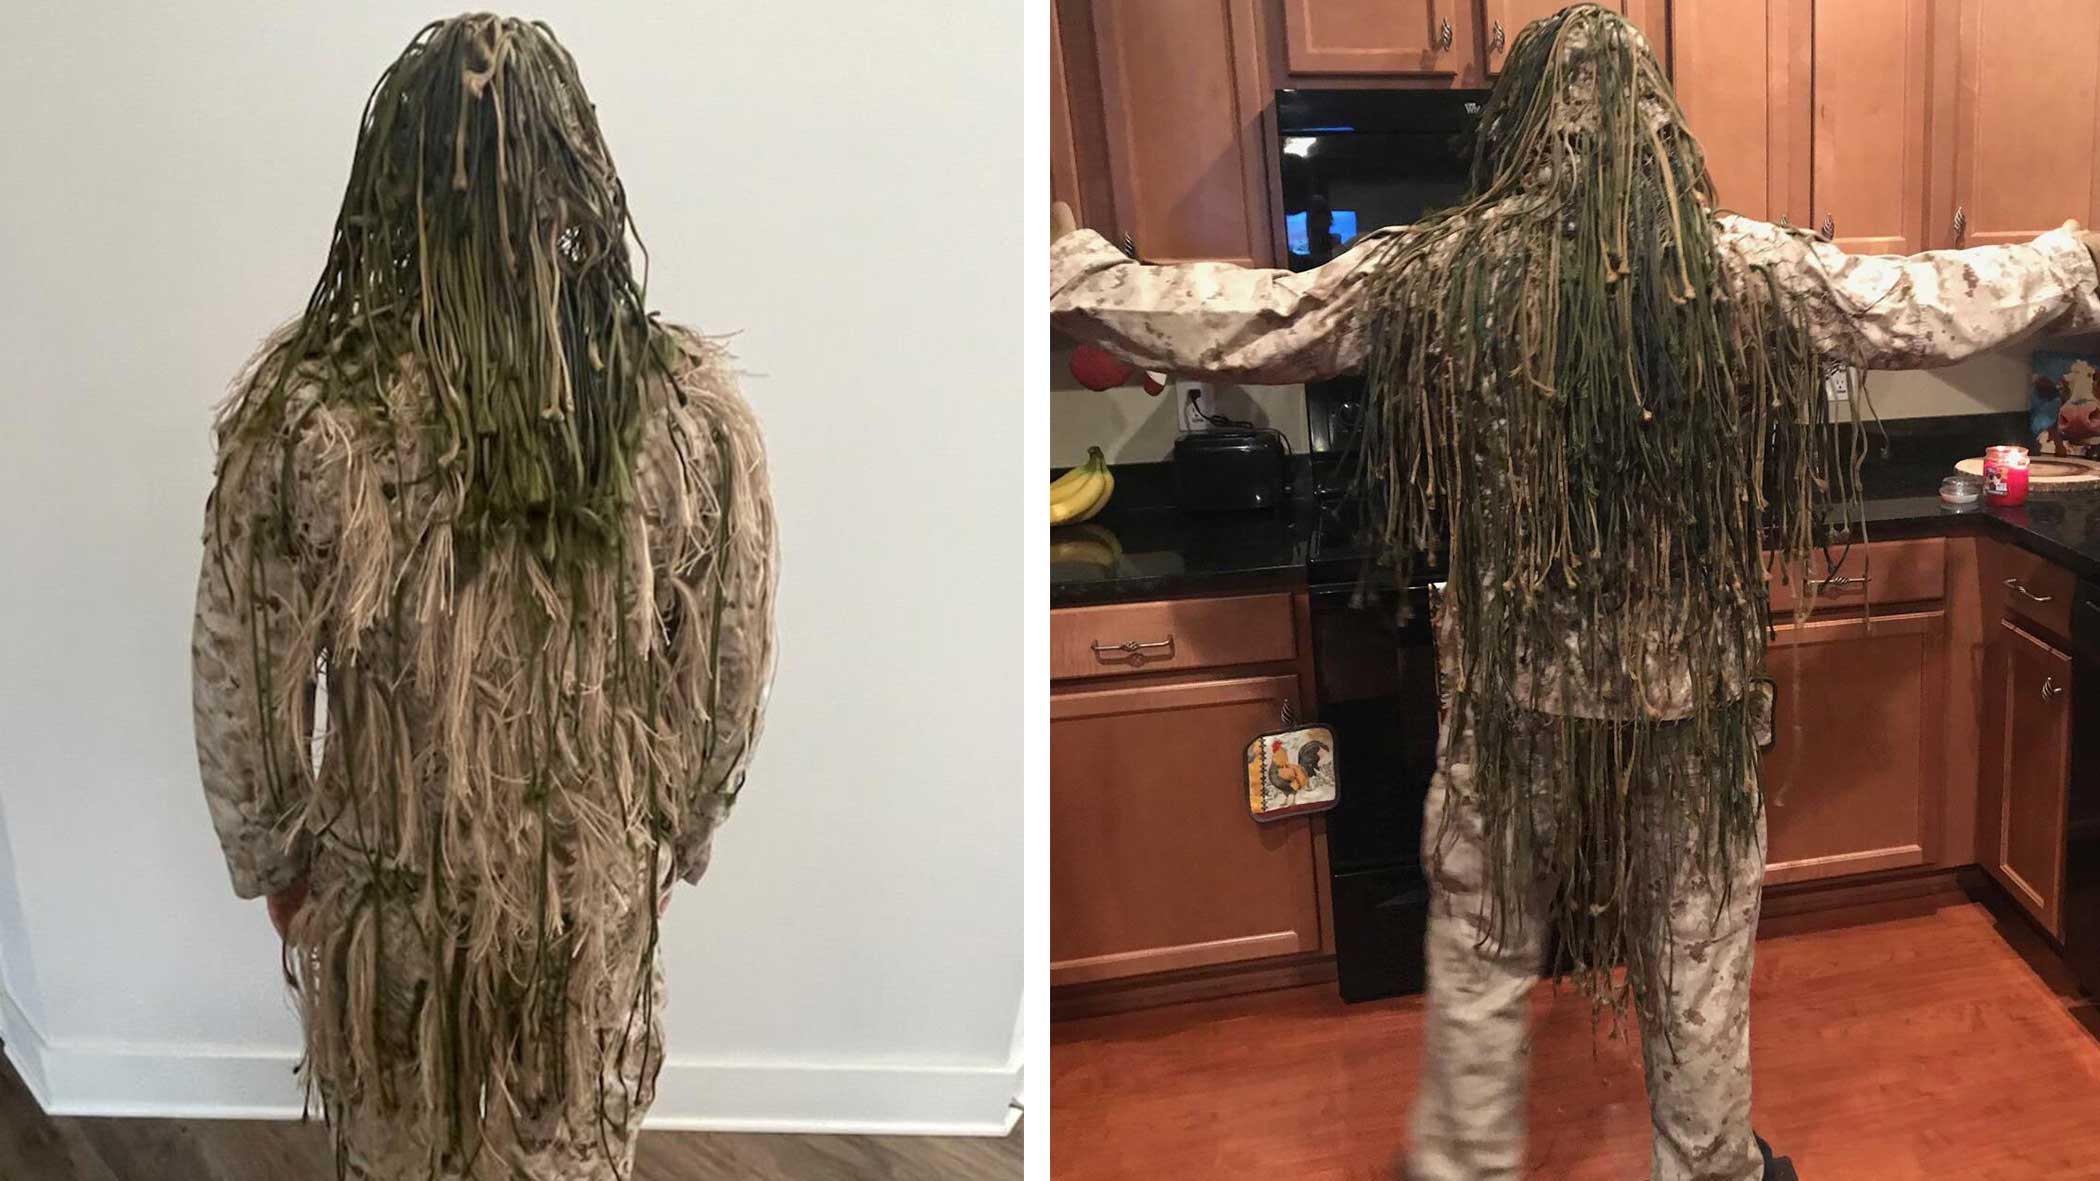
Notice this ghillie suit is mostly tan. Tan is a good light base color. You can always darken your suit in the field, by attaching vegetation or getting your suit dirty. But if you have a dark base color like green, it’s hard to lighten that up when going through a tan field of wheat/goldenrod.
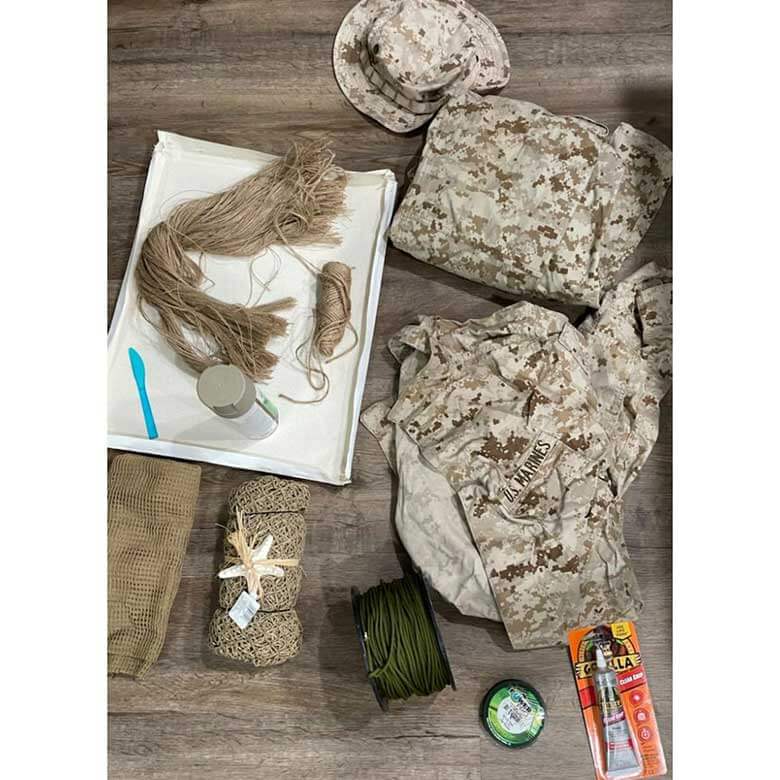
To start out; let’s collect some materials you’ll need to get complete this project.
Materials Needed:
- 1 set, USMC desert MARPAT cammies (or similar)
- 1 USMC desert Boonie cover (or similar)
- 1 roll of canvas, or 4 sheets of blank canvas
- Jute
- At least 500ft paracord, preferably 150ft combinations of green, tan, brown, or camo
- Tan spray paint
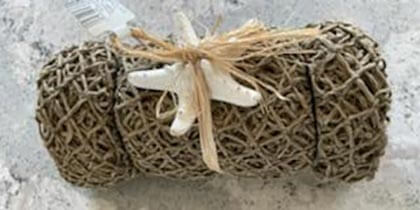
- Fishing net (purchase decorative fishing net at a local crafts store)
- Braided fishing line 10lb test or higher
- Sewing needle
- Glue (preferably E6000 or gorilla glue)
- Strong scissors
- Disposable butterknife
- Lighter
- Needle-nosed pliers
- Hot glue gun (recommended but not required)
- Small camo zip ties (optional)
Here Are the Steps to Make a Ghillie Suit
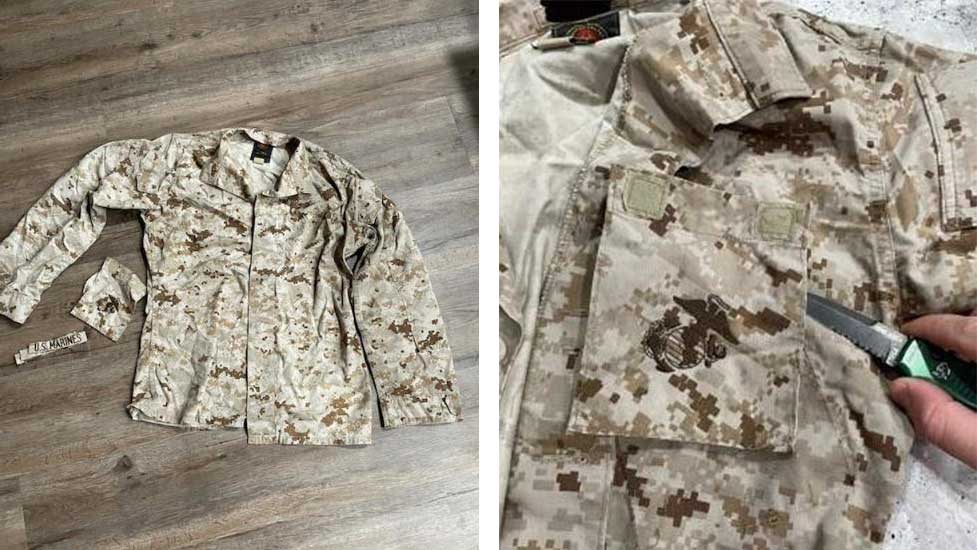
Step One: Remove Pockets and Name Tapes From Blouse
Using a knife, carefully pick the stitching from under the chest pockets all the way around the pockets and remove the chest pockets. This is difficult, so take your time and try your best to not cut or rip holes in the main part of the blouse, but if you do that’s not a big problem, as it will be covered with a protective layer of canvas anyway.
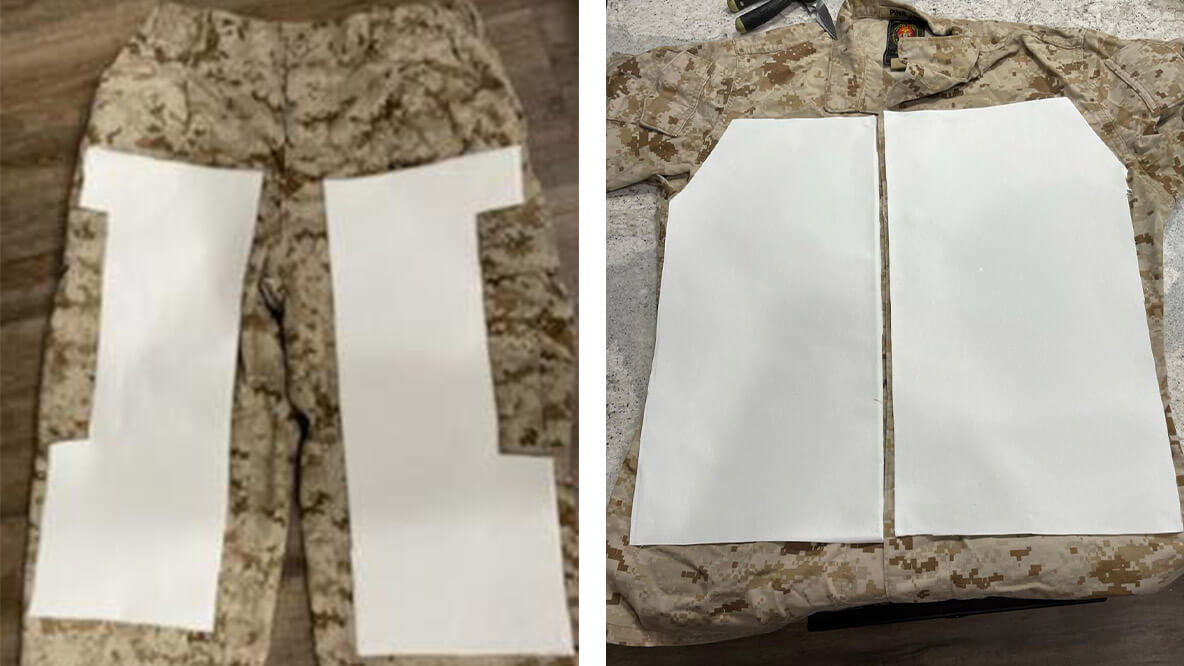
Step Two: Fit the Protective Canvas Layer
For this step, you’ll need four pieces of canvas cut out and placed on the blouse and trousers. For the blouse, you want the canvas to cover from the top of your pectoral muscle, down about an inch from the bottom.
For the trousers, place the canvas down and cut out a square on each leg so that the side cargo pockets will still be easily accessible and are not covered or made inaccessible by the canvas.
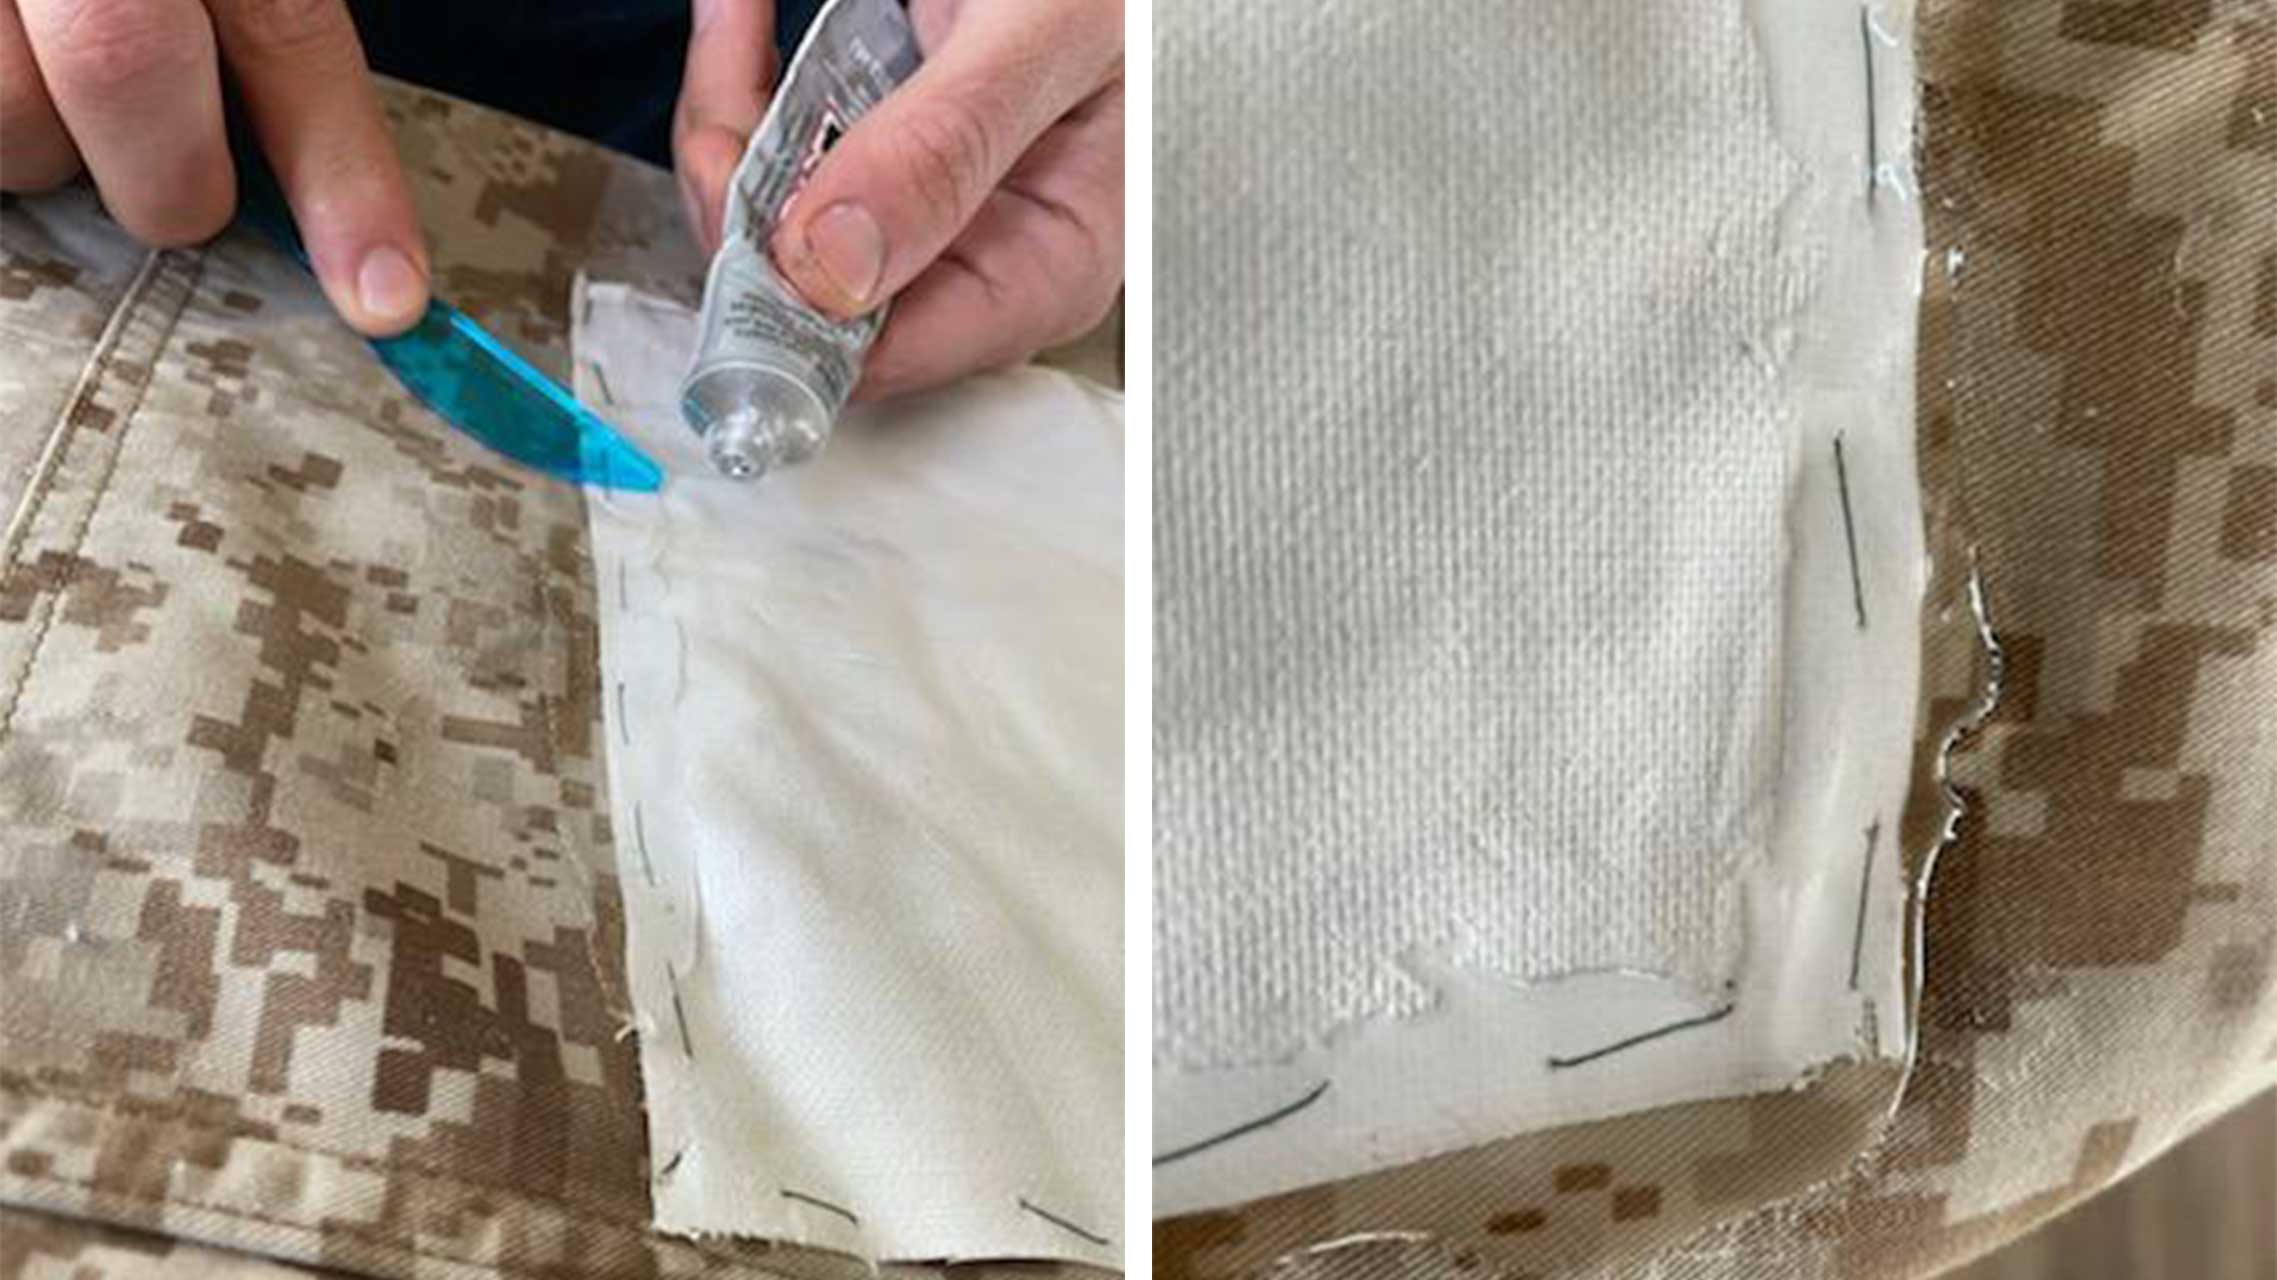
Step Three: Glue and Sew the Canvas Onto the Clothing
The best way to do this is to start at the top of each canvas and glue across horizontal lines about every inch. Once the piece of canvas is glued on, you’ll need to begin sewing quickly, as the more the glue hardens the more difficult sewing will become. Be sure to glue the edges down well.
This canvas is what protects the suit while being dragged around rough terrain. Without the protective canvas, the Cammie blouse would shred very quickly. Sew the edges of the canvas on. Using a pair of pliers may make this task much easier due to the difficulty of poking the needle through canvas, fabric, and glue.
Once you have glued and sewn the piece of fabric down, we need to use more glue to protect the stitching and the borders of the canvas from peeling off. Using the glue and a disposable butterknife, spread the glue on the border of the canvas, while also covering the stitches in glue. This will create a hard border surface, and ensure the stitches and canvas are not shredded while dragging your chest and belly over rough, rocky surfaces.
Step Four: Painting
This is the quickest and easiest part of this project. All you have to do is lay your cammies on the ground, and spray paint the canvas so that it is a more organic color. Tan is the best base color for any ghillie suit. As mentioned above, you can always darken your suit in the field, but you cant easily lighten your suit.
That’s why a tan base, with green additives, generally works the best. If you want, you can get two different shades of tan and use them together to make it even more camouflage, but it isn’t always necessary. Make sure to use a flat paint and not glossy paint as gloss will reflect light and make you stand out! Paint specifically meant for camouflage works the best.
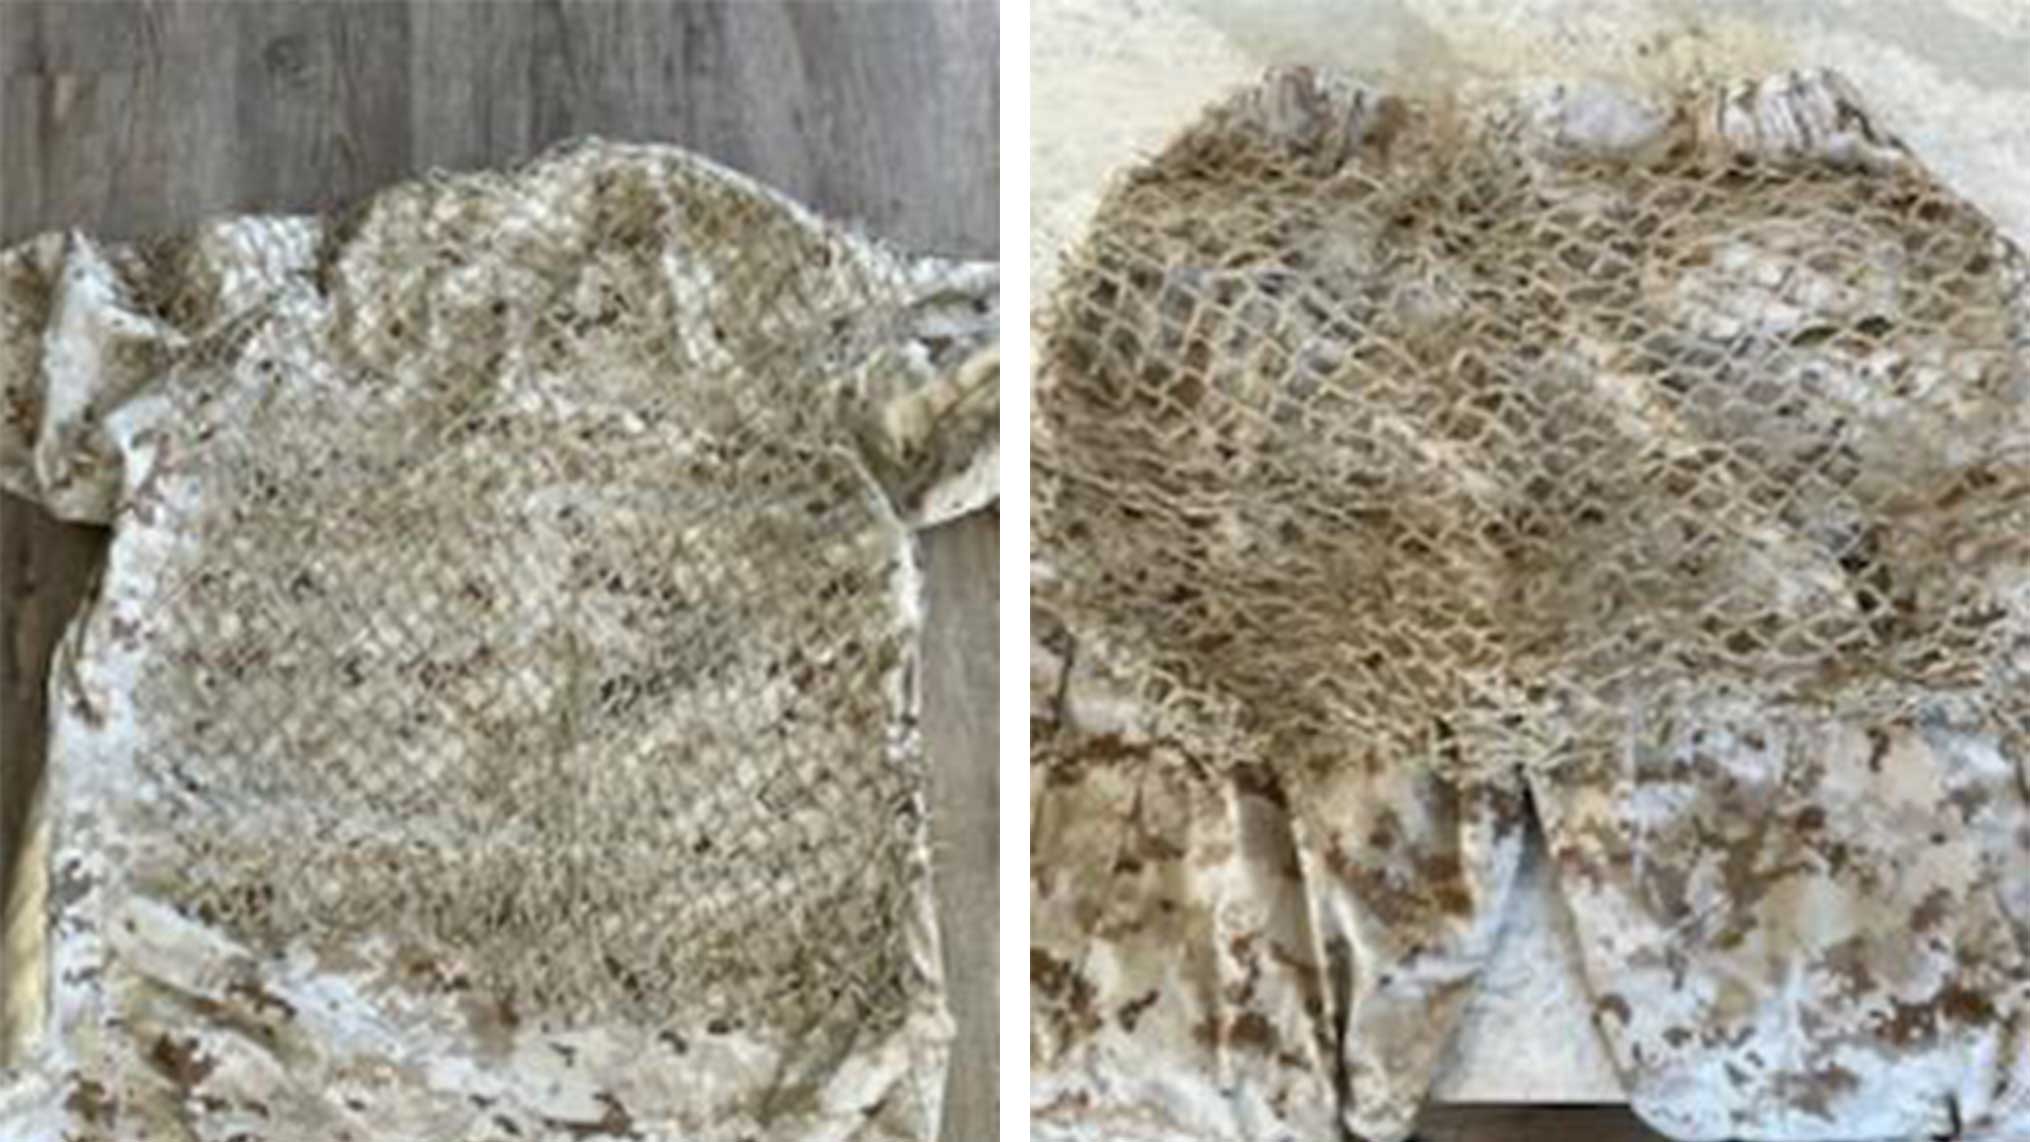
Step Five: Applying the Netting
This is probably the most difficult task you’ll face in building your own ghillie suit. This works much, much better if you can get a partner to help you.
Many craft stores will sell decorative fishing nets. Surprisingly, these nets are actually made of rope and are very light and strong. They are perfect for securing jute, 550 cord, and vegetation. I purchased my roll from Michaels craft store for around $10.
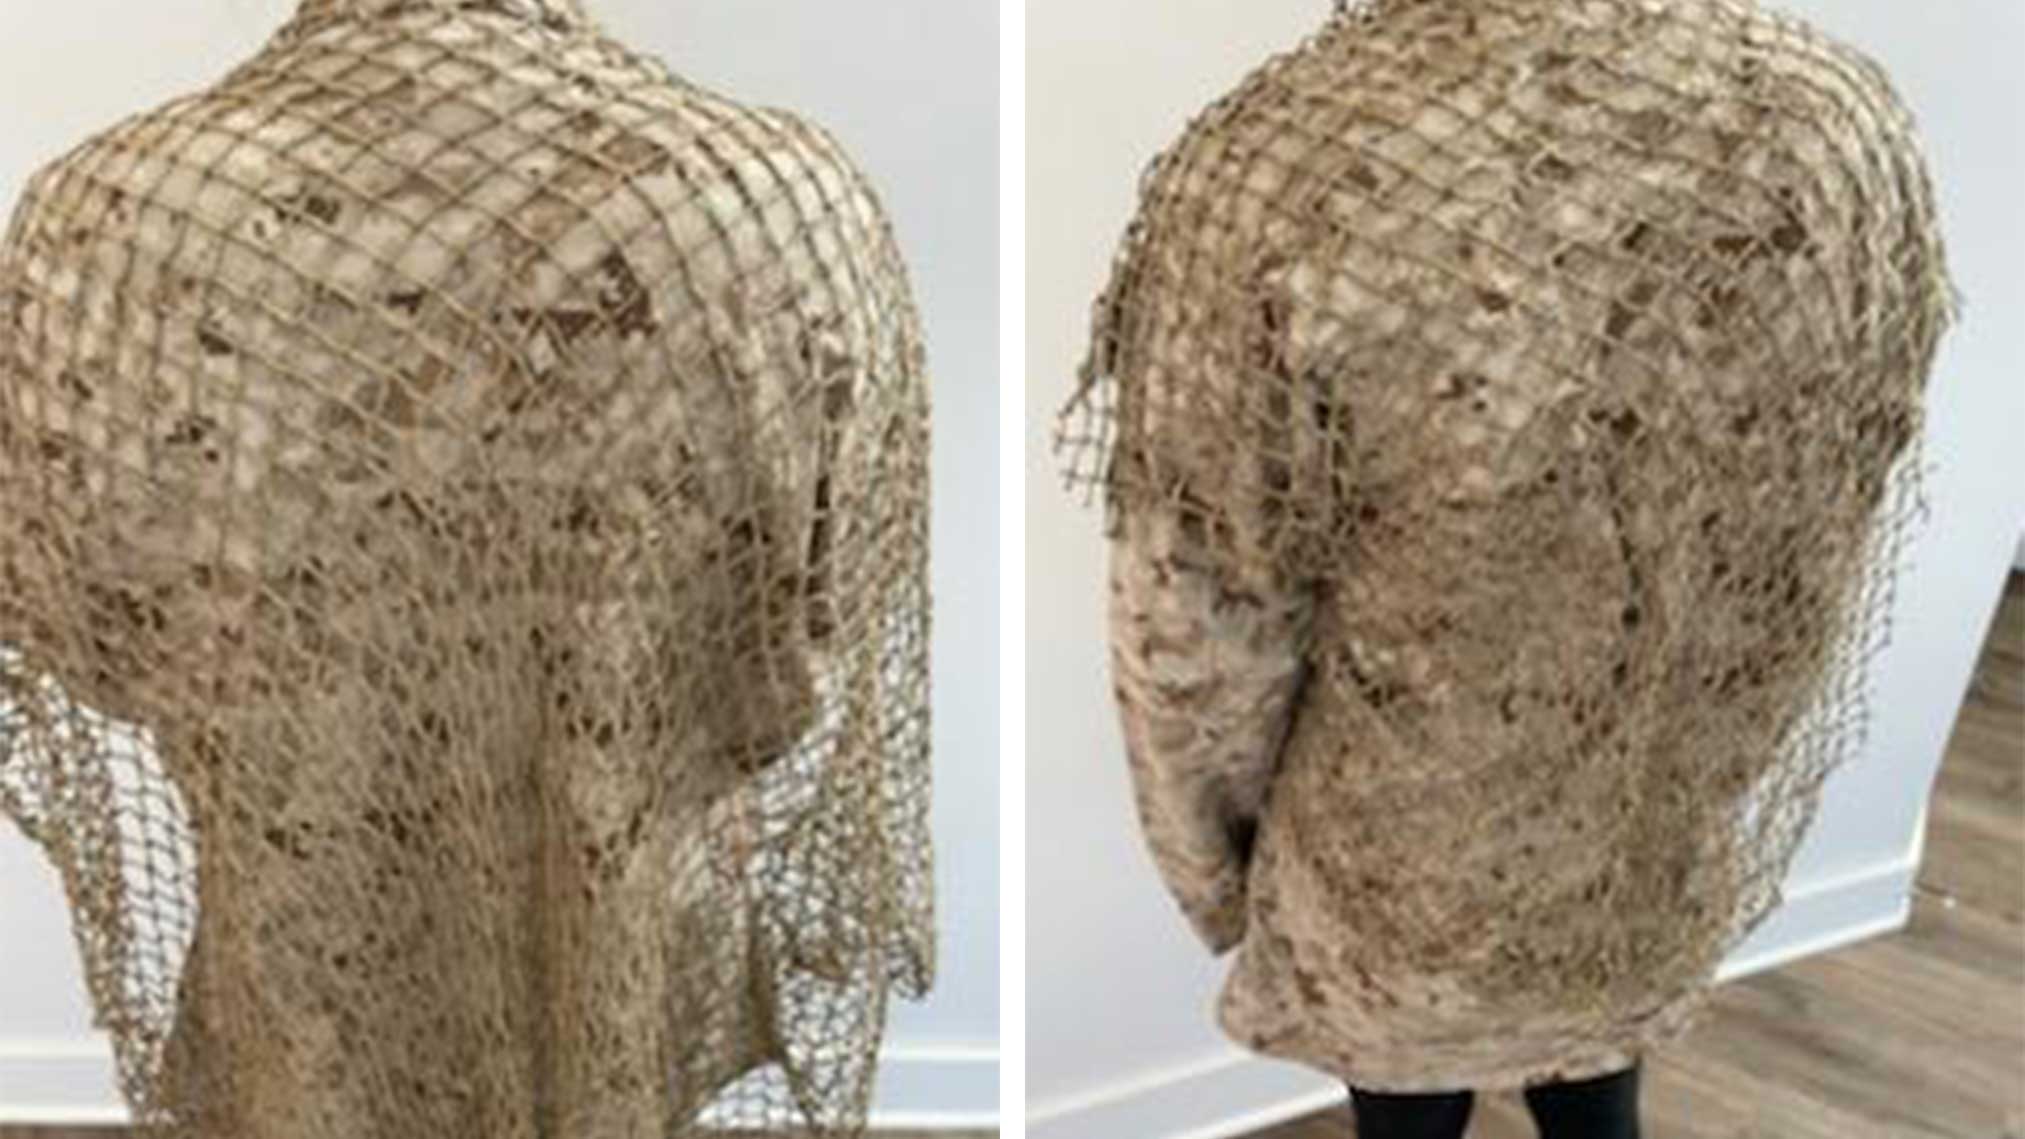
The easiest way of doing this part is to grab a partner and work together. You should only need a partner for about 5 minutes, so you aren’t asking them of much. Have your partner drape the netting over your shoulders, and hot glue little cross-sections onto the blouse.
Do this around the back of the neck, and around the edges of the back. All this is going to do is secure the net in place so that you can sew pieces down without the netting moving all over the place. The hot glue does nothing to permanently secure the netting to the blouse, it’s simply a placeholder.
Next, cut and remove the excess netting. Imagine in your head a short-sleeved T-shirt, and that is what you want to see on the back portion of the blouse. You really don’t need to have any on the front half, but you can if you want. Just keep in mind, that it is likely to get shredded while low crawling.
The same exact thing will need to be done with the backside of the trousers, however, instead of the T-shirt shape, you need to cut out a sexy booty shorts shape. At this point, you can remove the trouser and blouse and tell your partner you are done with them. If you do not have a partner, you can use the back of a chair as a person, but periodically put the clothing on after gluing every couple of spots so you don’t have any slack or tight spots in the netting.
Now, sew the cross-sections of the netting into the clothing, about every 2” horizontally and vertically. This netting needs to be secured extremely well, the goal here is to secure it so well that you can not rip it off no matter how hard you pull. This will take a long time. Cover each of the knots in glue, to secure the stitching just like we did on the outside edges of the canvas. Just a dot covering each knot will do.
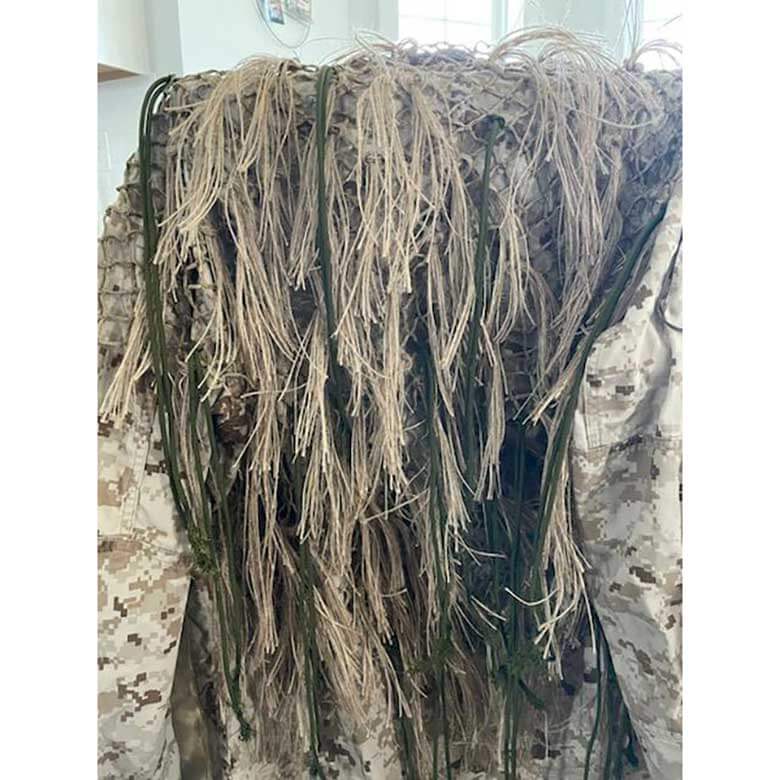
Step Six: Applying Jute
Cut numerous clumps of jute into roughly 12” strands and loop them through the netting, as pictured below. Ensure that the jute is pulled DOWNWARD through the loop, and not upward. Repeat this until the back of the suit is nice and “hairy”. This provides a good base level of camouflage, and really “blurs” your image from a distance.

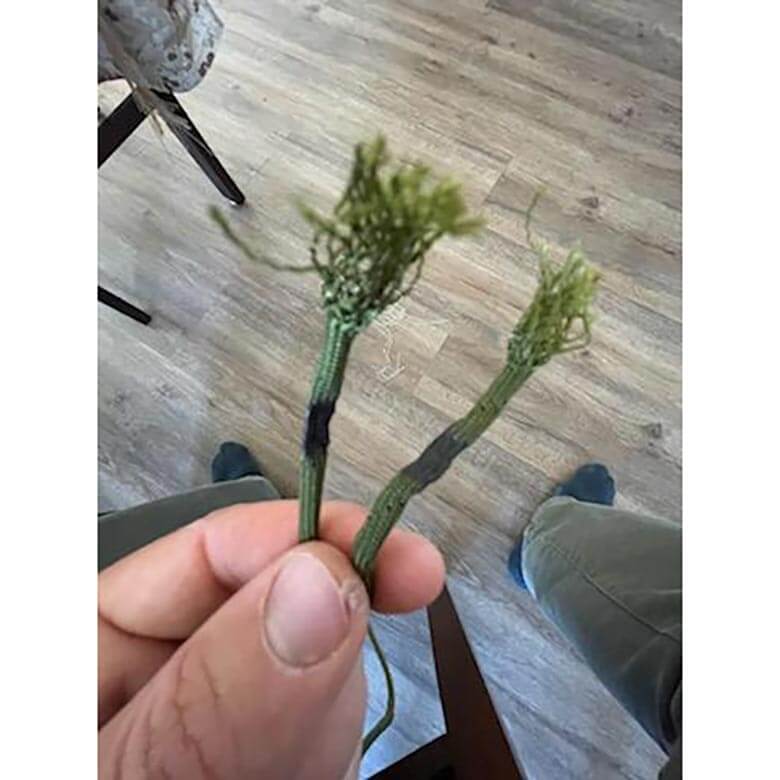
Step Seven: Prepping and Applying 550 cord
This is the part that I go all out on. I spend, by far, the most amount of time of this project prepping and applying 550 cord to my ghillie suit. The 550 is a crucial part, that is what you use to tie in the vegetation that truly makes you invisible. Use enough of it, and it will act in the same way as the jute does, breaking up your outline.
To prep the 550 cord, ill break this down into a few steps. First, cut about 100 pieces of 550 cord in anywhere from 12”-24” sections. When you have that massive pile of 550 cord strands, remove the 7 white strings inside, known as the “550 guts”. Fun fact about 550 cord that some people do not know; the 7 strands of white string in the guts are all rated at 50lb test. The hollow tubular shell that the guts are contained In, is rated at 200lb test. Altogether, you have 550lb test paracord. Hence the name, 550 cord. In a pinch, you could remove a few strands of the 550 guts to make much longer yet weaker cordage. Anyway, we won’t be needing the 550 guts, so either throw them away or put them aside.
The second step is to use your scissors or knife to fray about the last 1” on both ends of each piece of 550. Then, using a lighter, heat up the 550 about another 1”-2” away from the frayed edge until it turns a much darker color, then quickly pinch the dark color with your pliers. This is to ensure that the frayed edge of your 550 cord doesn’t completely fray all the way up the cordage in time, meaning you’d have to replace that piece of cordage. The frayed edge acts in the same manor as the jute, aiding in breaking up lines and creating a “blurry” effect from a distance.
If you are short on time, skip the fraying and melting part of this, as you can always do it later.
Prepping the 550 cord should have taken a long time. If you are short on time and you skipped the fraying and melting part, you can either do it at a later time, or you will be replacing 550 cord after breaking in your ghillie and using it several times after. You could also just melt the ends quickly and not fray them at all, but I prefer them frayed.
Now, just like we did earlier with the jute, loop and pull the prepped 550 cord DOWNWARD all over the back of the ghillie suit blouse and pants. The more 550 you attach, the more possible vegetation tie-in points you will have. If you use too much 550, it can really weigh down your suit while also keeping in body heat, so use as much as you feel is necessary, but at least put down a good base layer as pictured below.
Keep in mind to properly place the jute and 550 to cover the “5 V’s” of the human silhouette. Leave enough drooping down your neck, over your armpits, and behind your lower back/upper legs.
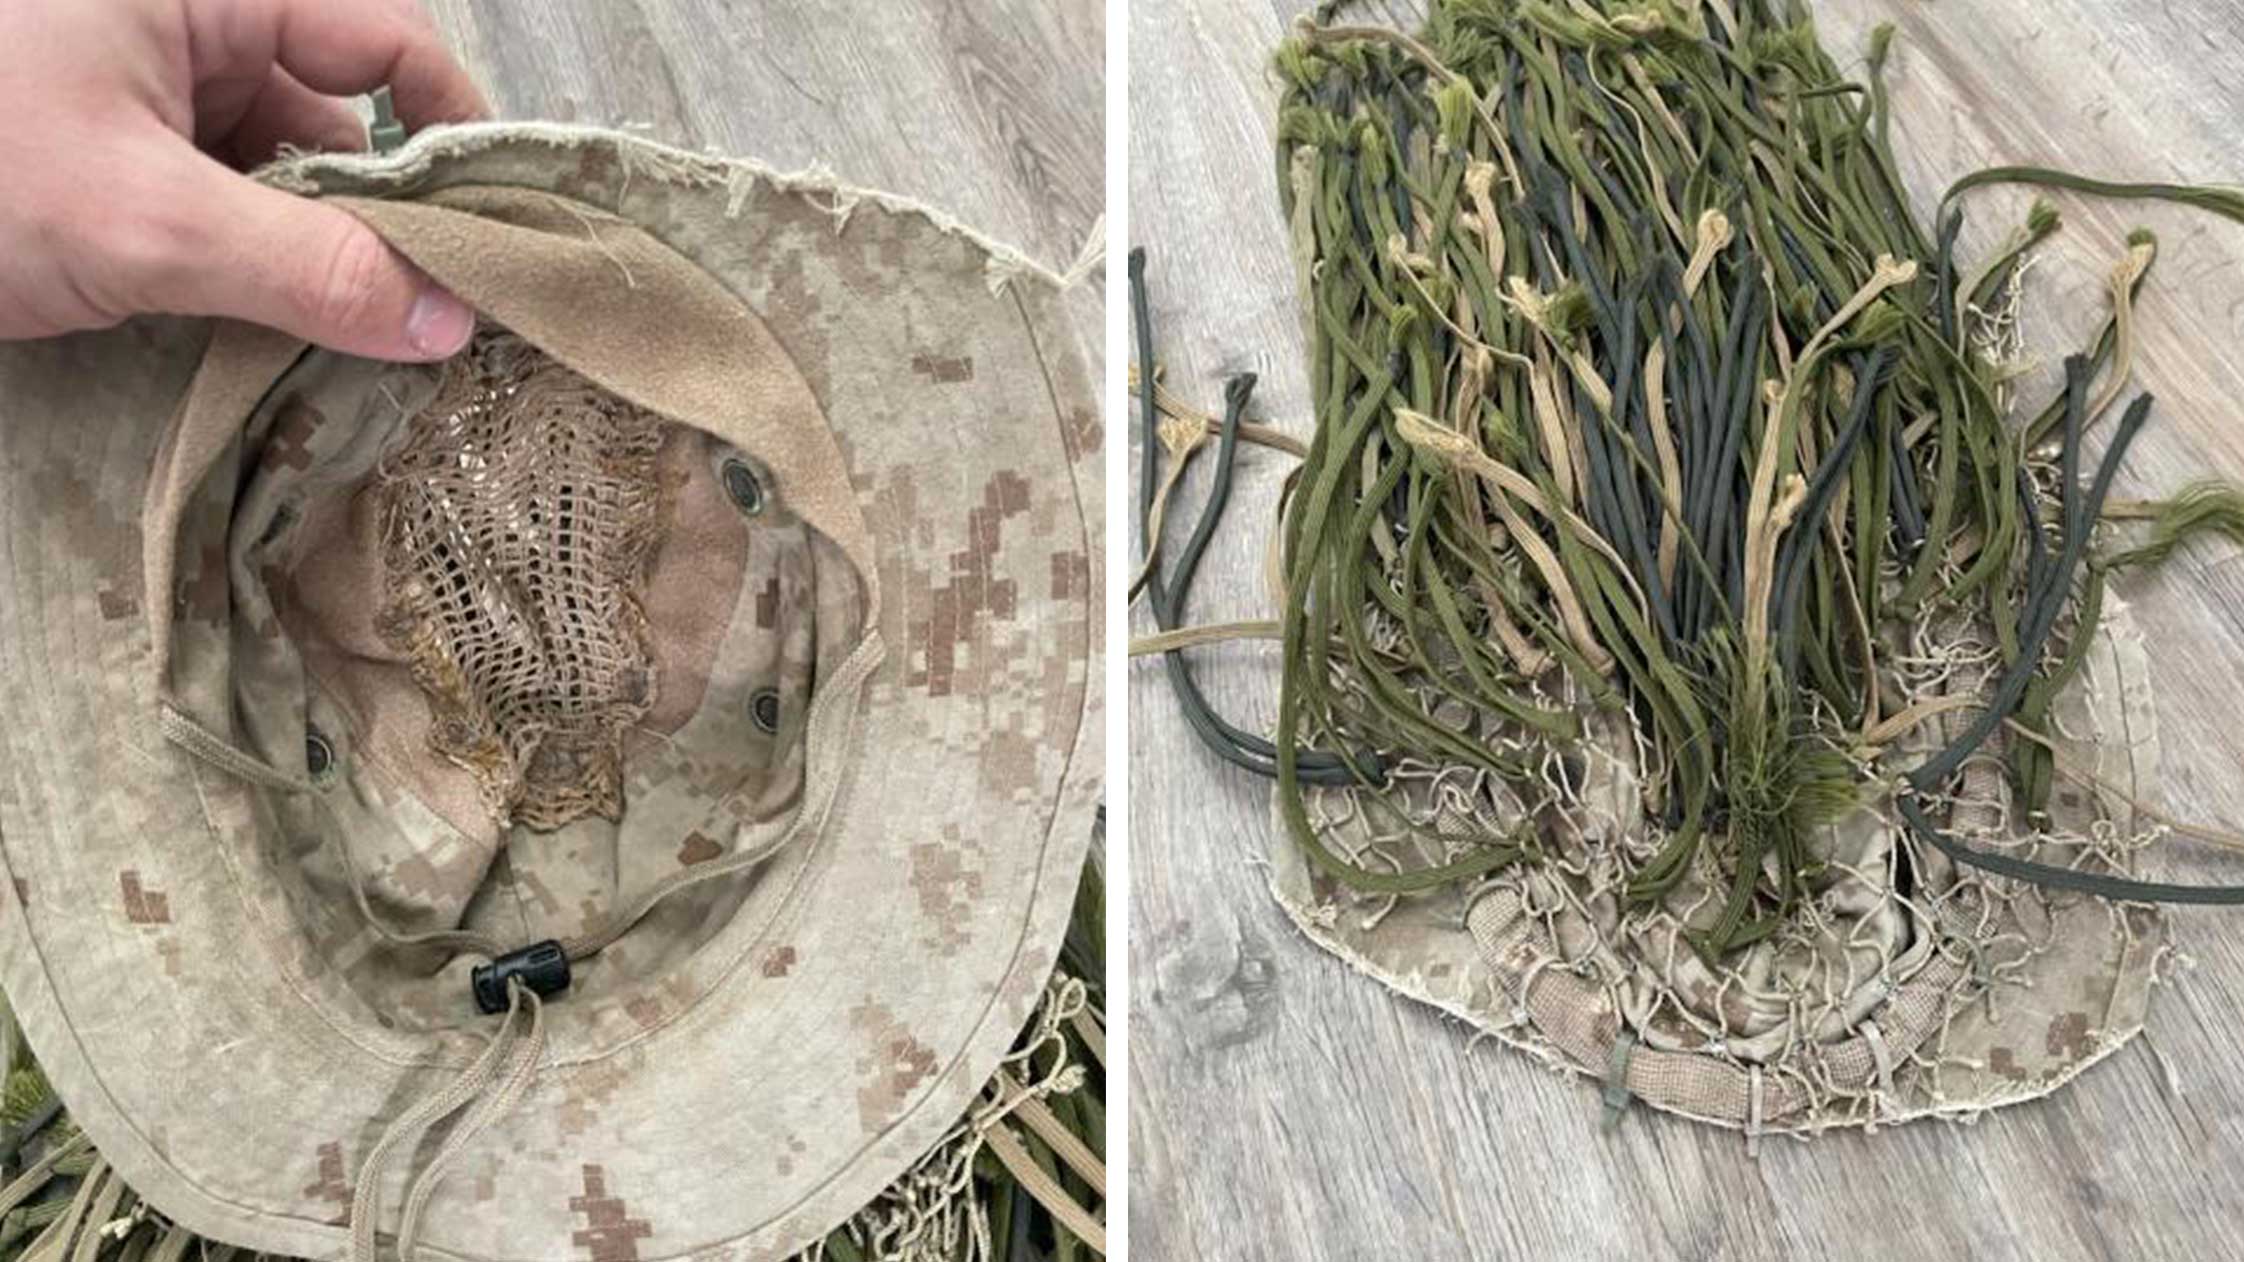
Step Eight: Ghillie Veil
The ghillie veil is by far the most important part of the ghillie suit. While you’re observing the enemy, some of your head is the only part of your body that should have a direct line of sight to the enemy. Many experienced scout snipers will only bring their veil with them, but only after mastering the technique of stalking. Some will bring their veil and blouse, opting to leave the trousers behind.
The first step in making a veil is to cut a straight line on the brim across the forehead. This will prevent the Boonie from casting a dark shadow on your face while wearing the veil. Next, grab a scrap piece of netting and zip tie them onto the loops of the Boonie. (my zip ties are camo, look closely).
Sew some more knots on there to really secure the netting and don’t forget a dot of glue on each knot. Then, finish the veil with additional prepped 550. I personally like to go super heavy with the 550 on the veil, to cover my neck, and provide a ton of tie-in points.
One thing I did on my veil includes a heat vent on top. I cut a square out of the top, attached some tactical mesh, then secured it with glue and some sewing. The same thing can be done to your back, underarms, crotch, or anywhere you want. I decided against putting vents anywhere on my body, as it will compromise the integrity of the suit. You shouldn’t be crawling on your back or top of your head much, so those two spots aren’t a bad idea.
Step Nine: Fill in Empty Spaces and Correct any Issues
At this time, you should be preparing your suit for use in the field. Pull on the netting to find any loose spots, add any more glue where it may be needed, add jute or 550 in places where it may be needed. The first time you break in your ghillie suit should identify weak points or problems in the suit so that you can repair it, and prevent any problems in the future.
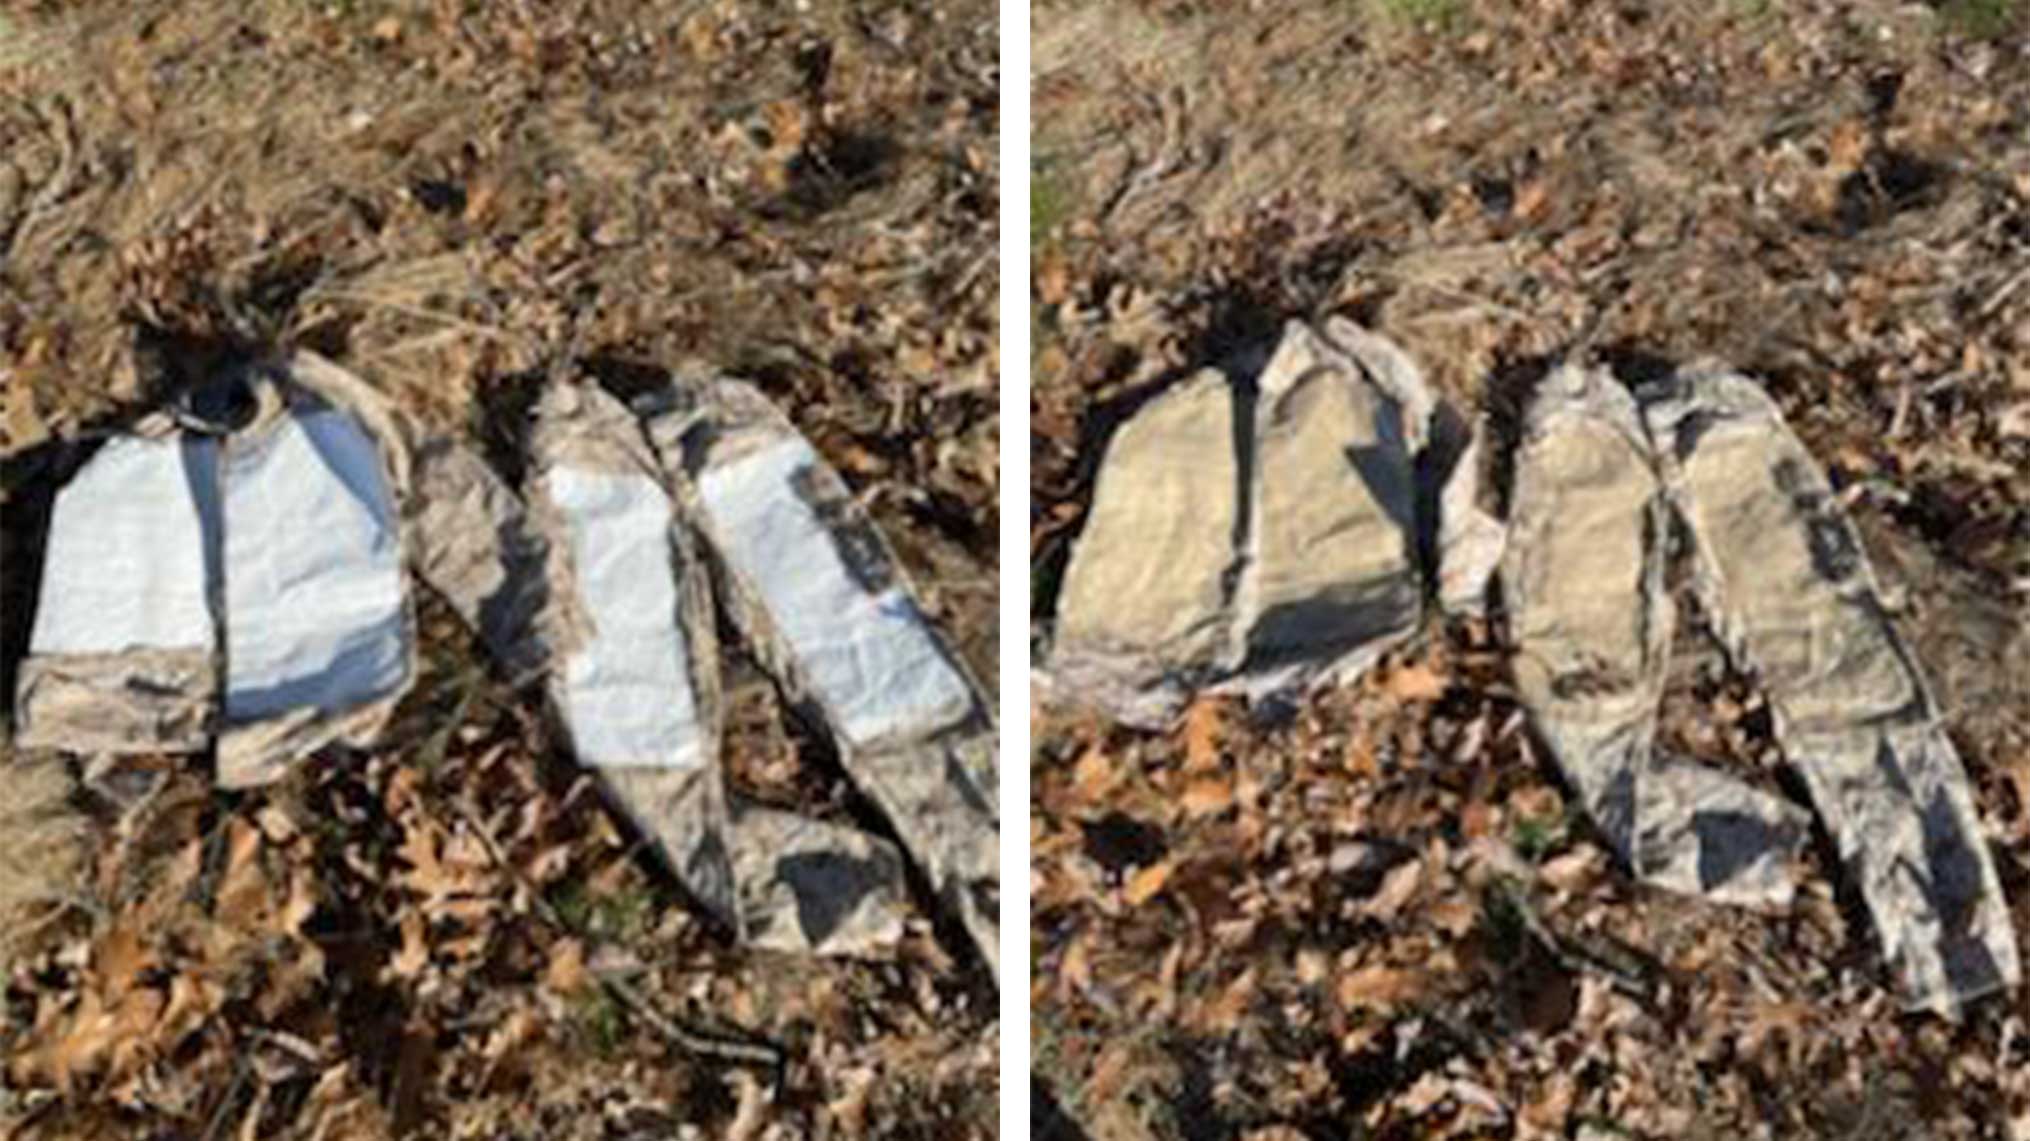
Pictured below are two suits, one being lighter with less 550 and more jute, and the other suit having no jute and heavy 550. I personally don’t care much for jute, as it should be covered in vegetation anyway, but it is a good base camouflage. I personally love heavy 550 on the ghillie veil, because I tie in so much vegetation. It gives almost endless possibilities of tie-in points for all types of vegetation. In many cases, Marine Scout Snipers will only use their ghillie veil while quickly stalking up to a tree line to conduct observations. Therefore, I really spend time making the veil perfect.
Again, this ghillie suit is just a simple base idea. Tailor this suit to you and your environment. Add more jute, add more 550, some people take burlap sandbags and shred them up, using scraps to add texture to their suit. If you’re only going to be in a hayfield or fields of goldenrod, include much more tan than green.
If you’re going to be in the woods most of the time, include a little more green. If you’re in an area where there isn’t much vegetation, include more jute and things to break up your outline more. This is basically one big manly arts and crafts project. If it works, do it. Just remember, you can always darken your suit in the field, but if you bring a suit with a dark base color, it can be difficult to lighten it.
Building a ghillie suite does take a bit of work as you can see, if you’re interested we always have a page on our favorite ghillie suits here.
Utilizing Your Ghillie Suit – 9 Elements of Visual Perception
Now that we understand how to make a basic ghillie suit, I’ll get into the art and science of camouflage. Scientifically, there are 9 elements of visual perception. What this means is, there are 9 different ways your eye can recognize objects. A scout sniper must master all 9 elements to truly appear invisible. Failure of implementation even with just one of the 9 elements and the sniper will stand out to a trained observer. Fail at implementing several of the 9 elements and the sniper will stand out to a senior citizen with 3” thick lenses. The 9 elements of visual perception are as follows, and I will go over each element individually, to truly understand what is required to become invisible:
- Line/Outline/Edge
- Texture
- Light (reflection, sunlight, shadow)
- Shape
- Rhythm/Flow
- Color
- Contrast/Value
- Movement
- Positive/Negative space
Line/Outline/Edge
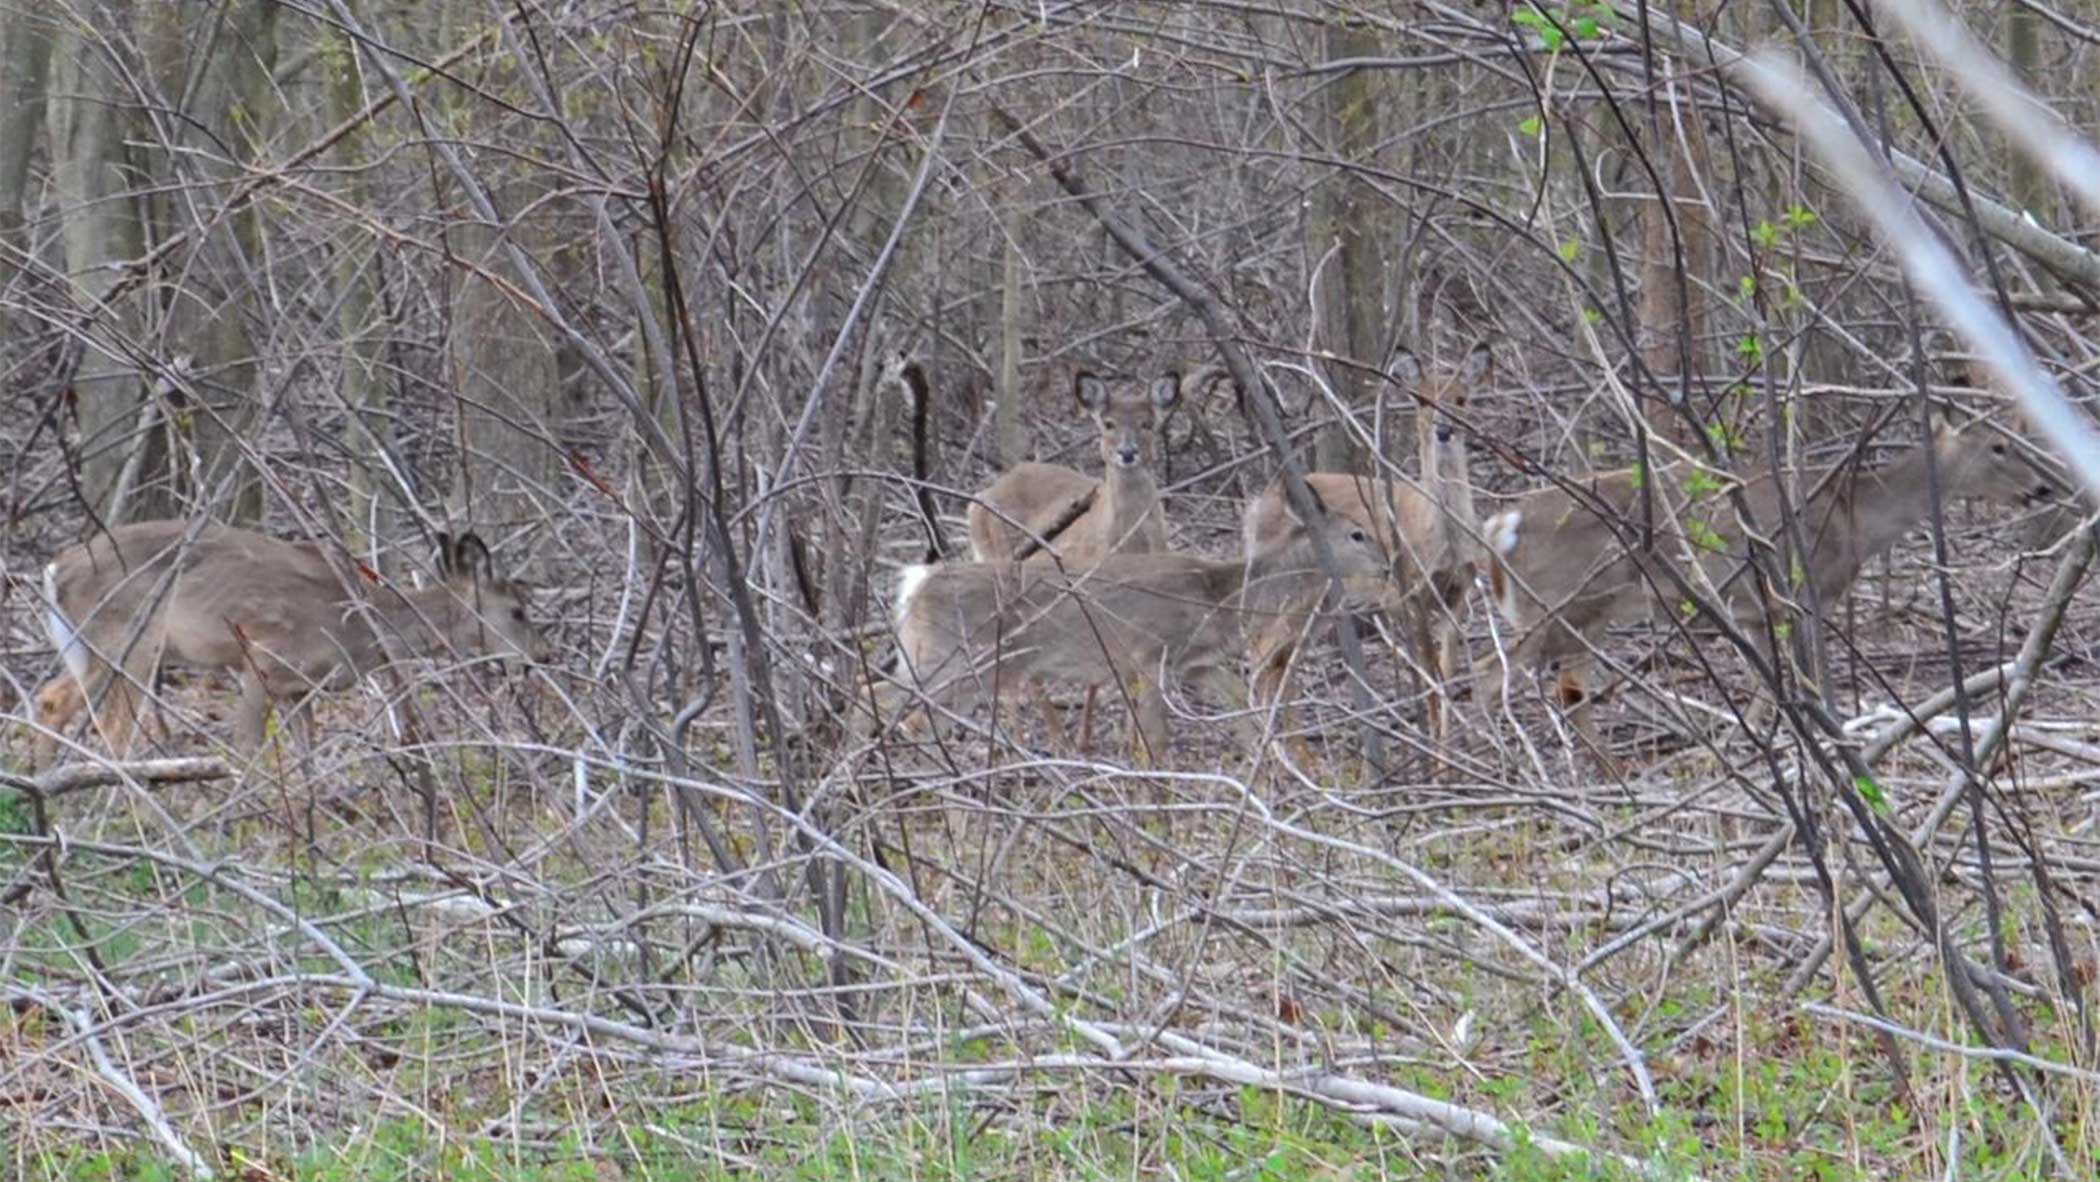
Everything, living or inanimate has a line or edge to it. These lines often lead to the outline of the object. The human eye picks up lines, edges, and outlines very easily. An untrained individual may see a line or edge while a trained individual will see the entire outline. Think about when someone sees a deer in the woods. Their color often matches perfectly, but sometimes you can see the horizontal line of a deer’s back. It is extremely rare to see any straight lines in nature or any perfectly symmetric shapes, so it’s crucial to avoid those at all costs.
In the picture above, upon first glance, you should see the horizontal line of the deer’s back, which will lead your eye to discover the outline of the deer, and finally recognizing this object as a deer. Look at the deer on the right. Cover his tail and face, and the only way you can tell something is there is because of the outline. The deer blended well with the other 8 visual elements of perception but not color, hence the white tail and black eyes.
How does this relate to a human in a ghillie suit? Well, humans have an outline too. In fact, there are 5 major points on a human outline that determine the human’s silhouette, but I will cover that more under the “shape” element. For now, think of a furry ghillie suit as something that breaks up the human outline, making it hard to recognize as a human. Imagine if this deer had a pile of sticks covering its spine and breaking up any perfectly horizontal lines, it would make it much harder to find.
Shape
A shape is the visual characteristic surface configuration of an object. When lines and edges come together, you will see the outline. Study the outline, and you will notice the shape, and determine what the object is.
The human eye easily picks up shapes, especially of the human silhouette, or anything that may be potentially dangerous such as a weapon. Some things, like the human silhouette, can be recognized instantly by its shape, especially when it contrasts with the background. People naturally associate an object with its shape or outline. At longer distances, the outline and shape of an object can be determined long before fine details can be scrutinized. The human body can be easily identified based off its shape unless the outline is altered. Altering the shape of the human body can easily be done by breaking up the outlines, and using the proper colors to blend the broken up outline with the foreground and background.
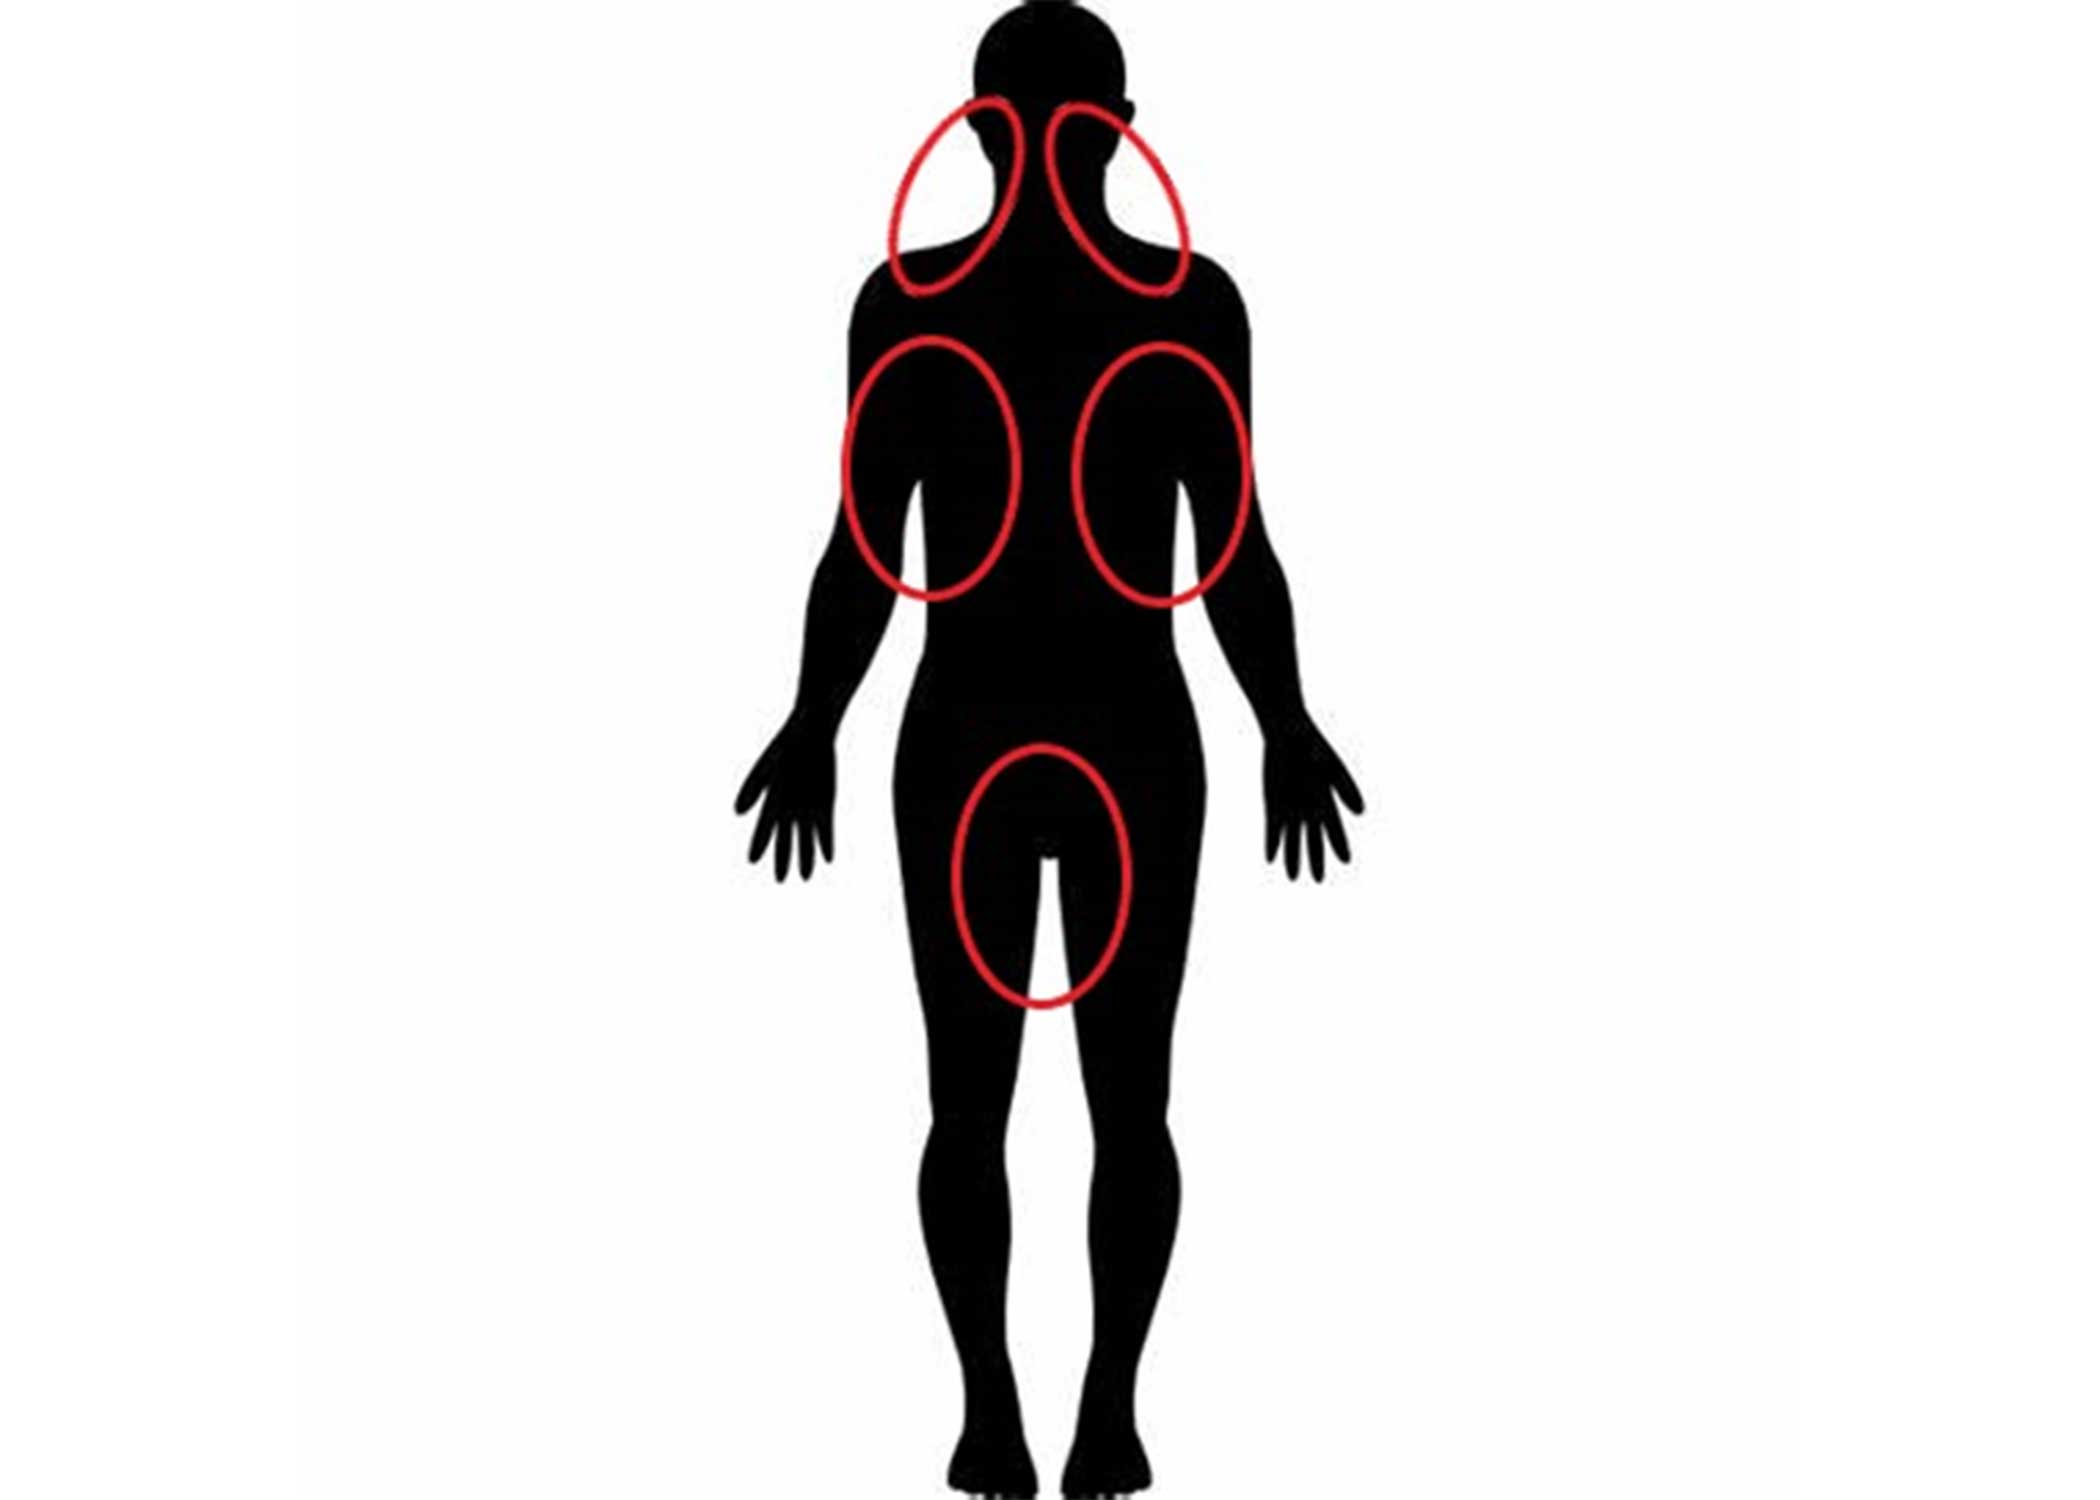
Outline and shape are fairly similar. Scrutinize the outline and you will determine the shape. As I mentioned in the “line outline edge” paragraph, there are 5 major points on a human outline that determine the humans silhouette. These are known as the 5 V’s. There are 5 sharp angles on your body that make up the human silhouette. One on each side of the neck, both armpits, and the groin area. These points are easily noticeable, and when noticed, are quickly determined to be the shape of a human.
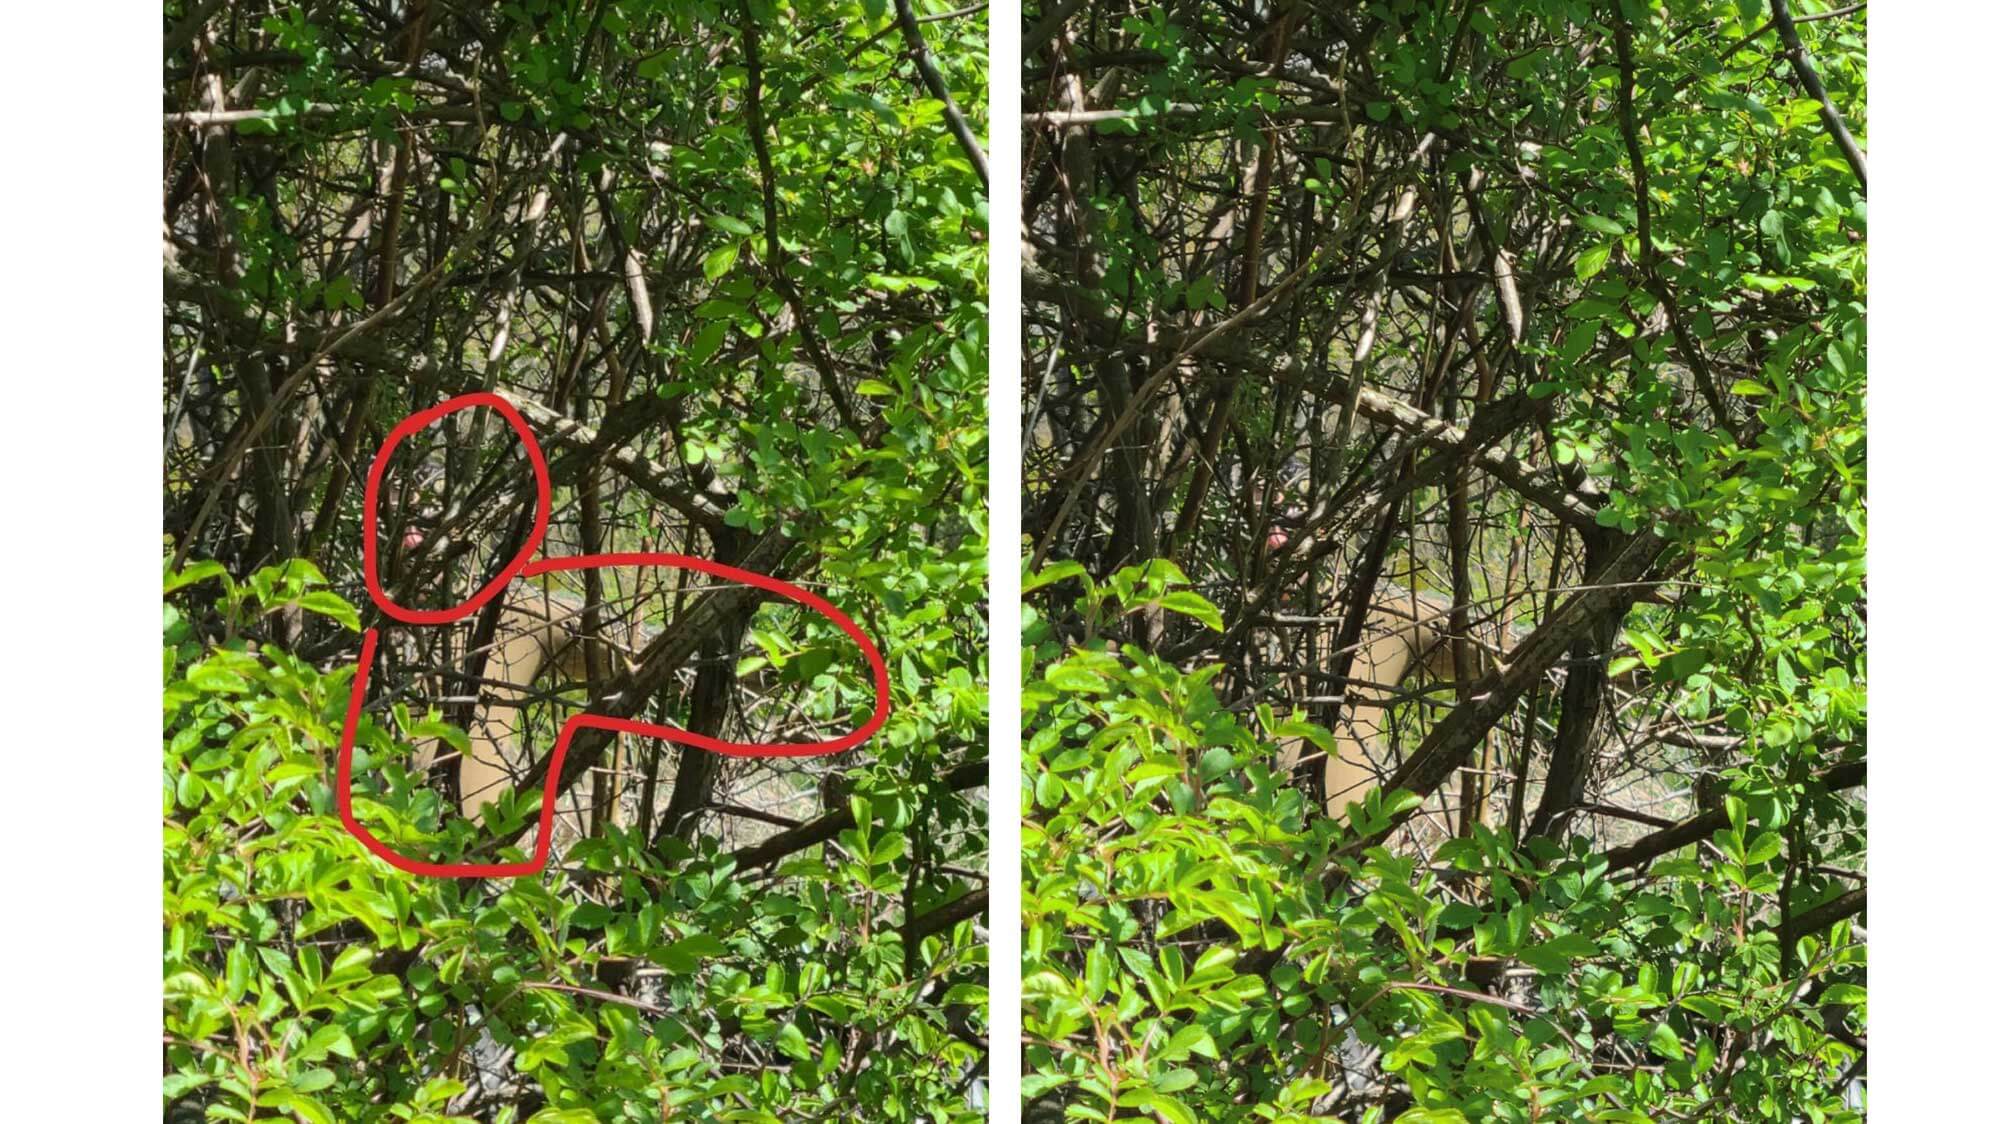
Notice in the images above, you see parts of my outline. Most noticeably, the vertical line which is my left ribs, left pectoral, and the horizontal line made by my left arm. You also very easily see the “V” made by my left armpit. Even through a bush, with a camouflage shirt on, this “V” is easily noticeable. After spotting this “V”, and part of my body’s outline, it becomes easy to see that this is the top left portion of a human body.
A ghillie suit must break up the human outline, and cover all 5 body angles to prohibit an observer from noticing and distinguishing the shape of the human body.
Color
Color is the property possessed by an object of producing different sensations on the eye as a result of the way the object reflects or emits light. Color is one of the easiest elements of visual perception to understand. Either the color matches with your environment or it doesn’t. However, there are tricks out there that can assist you in blending your color with the environment. For example, it is difficult and sometimes nearly impossible to blend into a tan desert environment with a green woodland ghillie suit. However, having a tan ghillie suit and blending into a woodland environment can be easy. Just add a little bit of green and now you’re good! Remember, you can always darken yourself in the field, but you can’t really lighten yourself. That is exactly why all USMC Scout Snipers make a ghillie suit out of their desert tan cammies.
Your environment has a baseline of color. The greater your color contrasts with the baseline color, the more visible you become. This is especially true when that color is not natural for that area. It can be difficult to identify an object strictly off its color, but incorrect color can attract the eye of an observer and lead him to scrutinize the object in question.
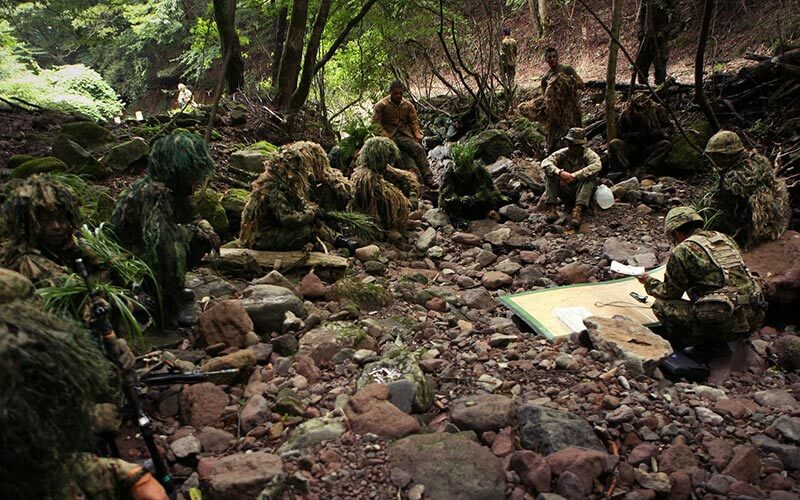
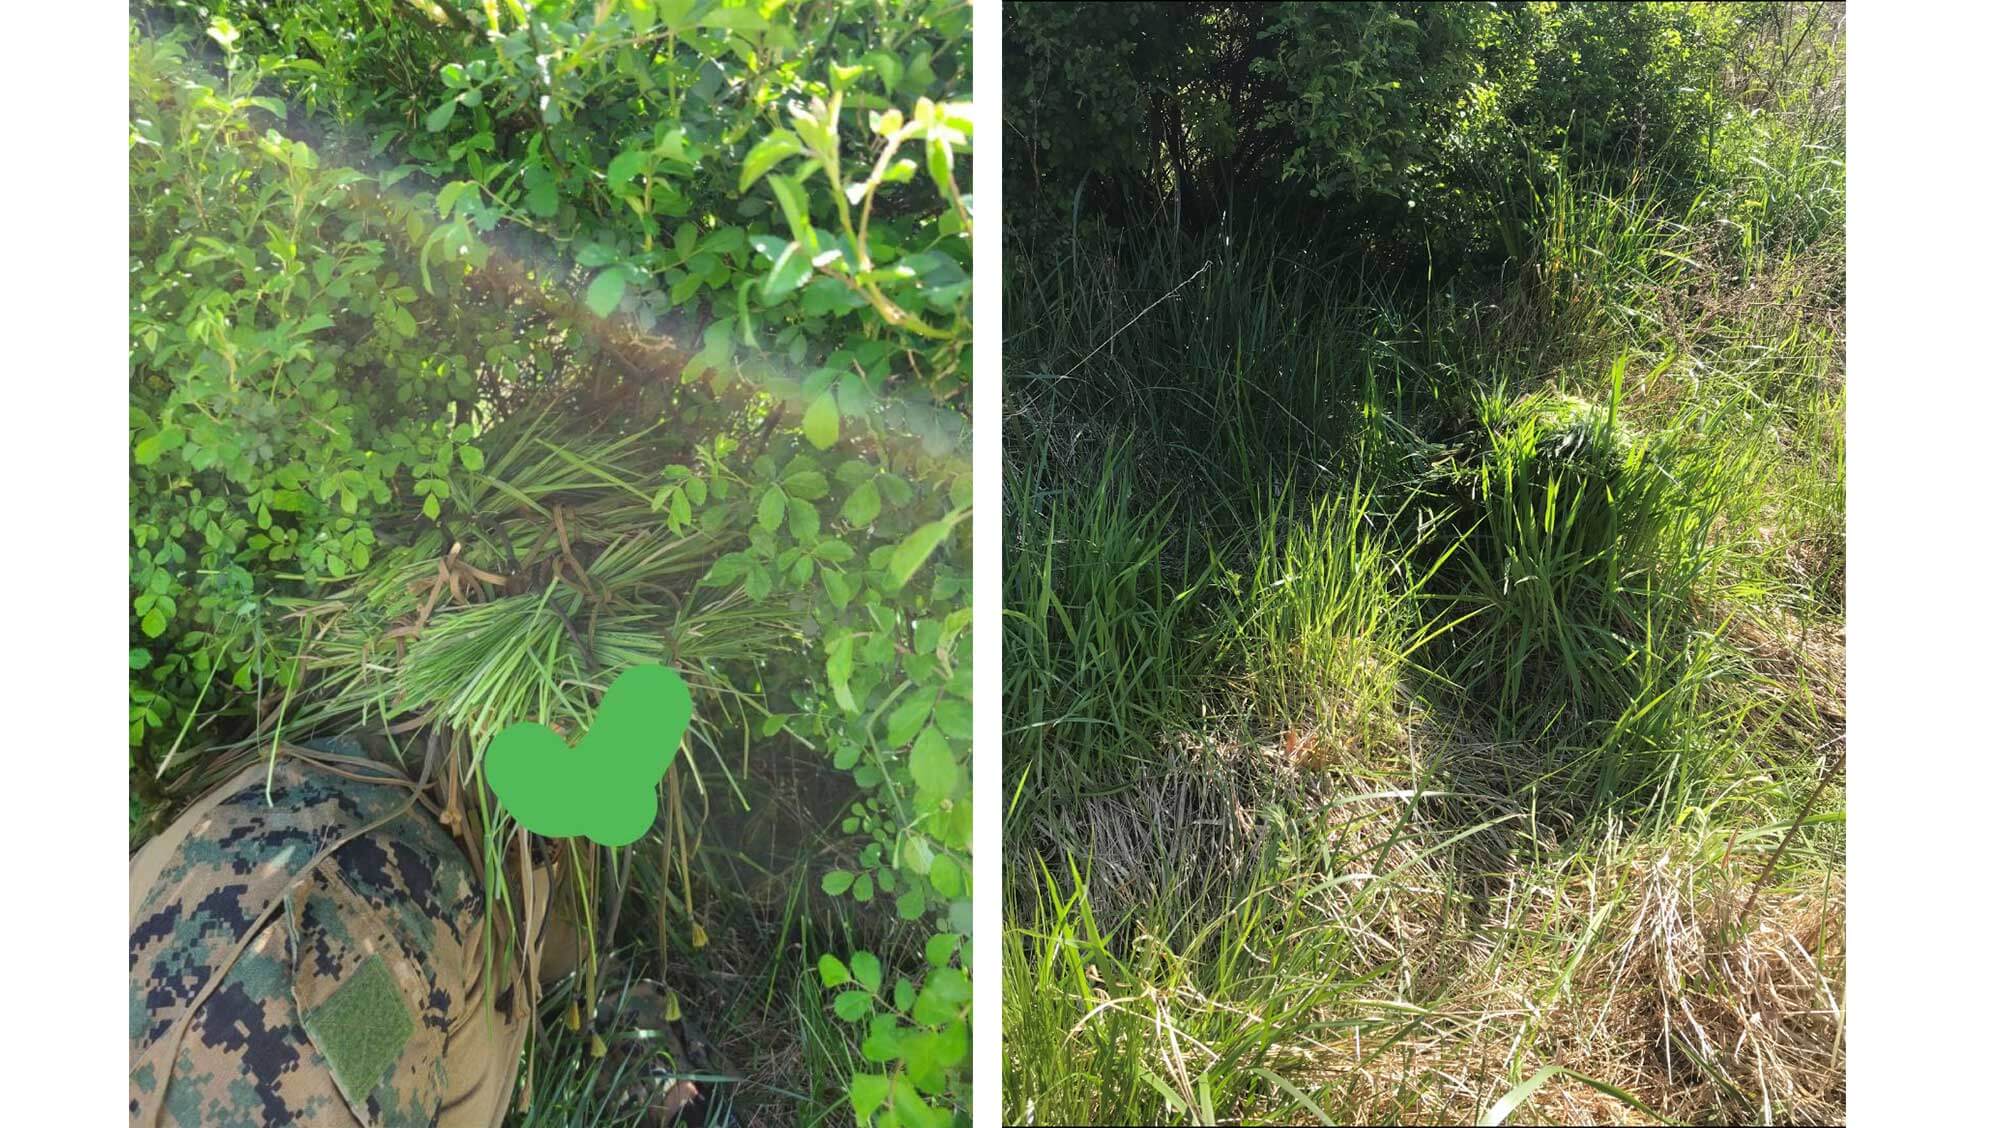
I was originally going to use these photos as an example of improper use of shadows, so for now, ignore the fact that my face is casting a large shadow. In this position, I was laying on my belly and am resting on my elbows. Notice how my lower body has a tan grass covering and my upper body is covered in green grass. I did this because the baseline color of this environment is about 50% tan and 50% green. I didn’t want to be a huge green spot or a huge brown spot. The two colors I chose match perfectly with the environment and the baseline. The only element of visual perception that isn’t used properly here is the element of shadow, so cover the dark spot with your finger and notice how my outline and shape is impossible to determine, and the colors match the baseline perfectly so that I do not draw attention to myself.
Contrast / Value
Contrast is a difference or strong dissimilarity between two compared objects. Value is the tone of something, the darkness or lightness of color. This can be easily confused with the element of color, however, color is more so choosing the right color to match your environment, and contrast/value is understanding how being darker or lighter can draw attention to yourself.
I’m not even going to point myself out on this one because it’s too easy. This is an improper use of several different elements of visual perception, but I mainly tried to contrast with my background here to show what it would look like. Notice how under the tree there is shade, and how much it contrasts with the grass out in the light. I am a darker object, laying in the lighter area. Had I have crawled up and to the left of that tree some, or under the bush on the right, I would be in a darker spot and would have much less contrast. As you can see, the color I have chosen matches the baseline well, but the contrast/value is what is giving me away here. You will be noticed if you are a light object in a dark area, or a dark object in a light area, even if your color is correct.
Texture
The texture is the feel, appearance, or consistency of a surface or substance. Like color, texture has a baseline also. If an object has a surface that contrasts with its surroundings, it becomes noticeable. An Object with a smooth surface reflects light and becomes more noticeable than an object with a rough surface that casts shadows upon itself. Very smooth objects tend to become shiny and reflective. This is something to keep in mind when trying to get the right contrast and value for your environment.
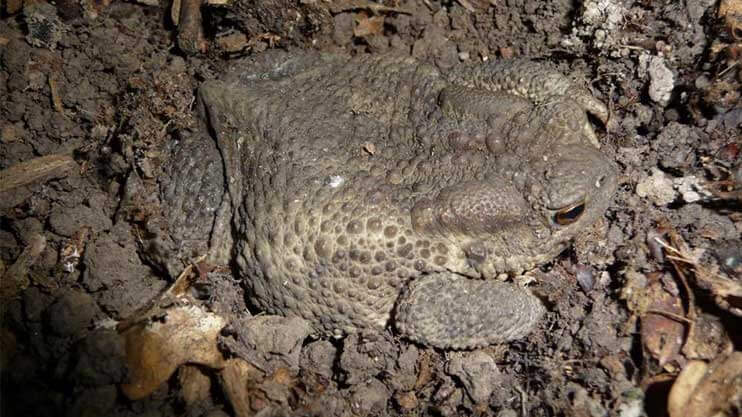
Matching texture can be a difficult to skill to master. Many animals have skin texture or fur with patterns that really allow them to blend into their environment well. The lumpy skin on a toad’s back is a good example.
Now I took the same veil that I was wearing in the “color” photos and made a good texture example. Imagine wearing a grassy ghillie suit with the texture of a leafy bush. While they can be the exact same color, your outline and shape are broken up correctly, your contrast/value is blended correctly but if your texture is off you will look out of place. Notice how the grassy veil doesn’t really blend well with the round, splotchy texture of the bush. Now on the next photo, I dropped the grassy veil onto the ground. Look how much better that texture matches up.
Rhythm and Flow
Rhythm and Flow are the patterned, recurring alternations of contrasting elements, movement, or variation characterized by the regular recurrence or alternation of different quantities or conditions; a pattern created by lines, forms, and colors.
Rhythm and Flow is my favorite of the 9 elements of visual perception. Many of these elements, such as color, are simply science. Your color(s) either match the baseline or they don’t. With Rhythm and Flow, you begin to steer away from the science of camouflage and dive deep into the art of camouflage. Do you, as a ghillie, blend beautifully with the environment? Does your suit bow to the wind like a light breeze rolling over a wheat field?
One of the best examples of seamlessly blending rhythm & flow is when you are hiding in a tall grass field, filled with cattails, often along a waterway. If your vegetation is bound too tightly to your body, it won’t flow in the wind like the rest of the vegetation. This lack of movement disrupts the rhythm and flow of the environment, creating an unnatural feeling and will draw an observer’s eye onto you.
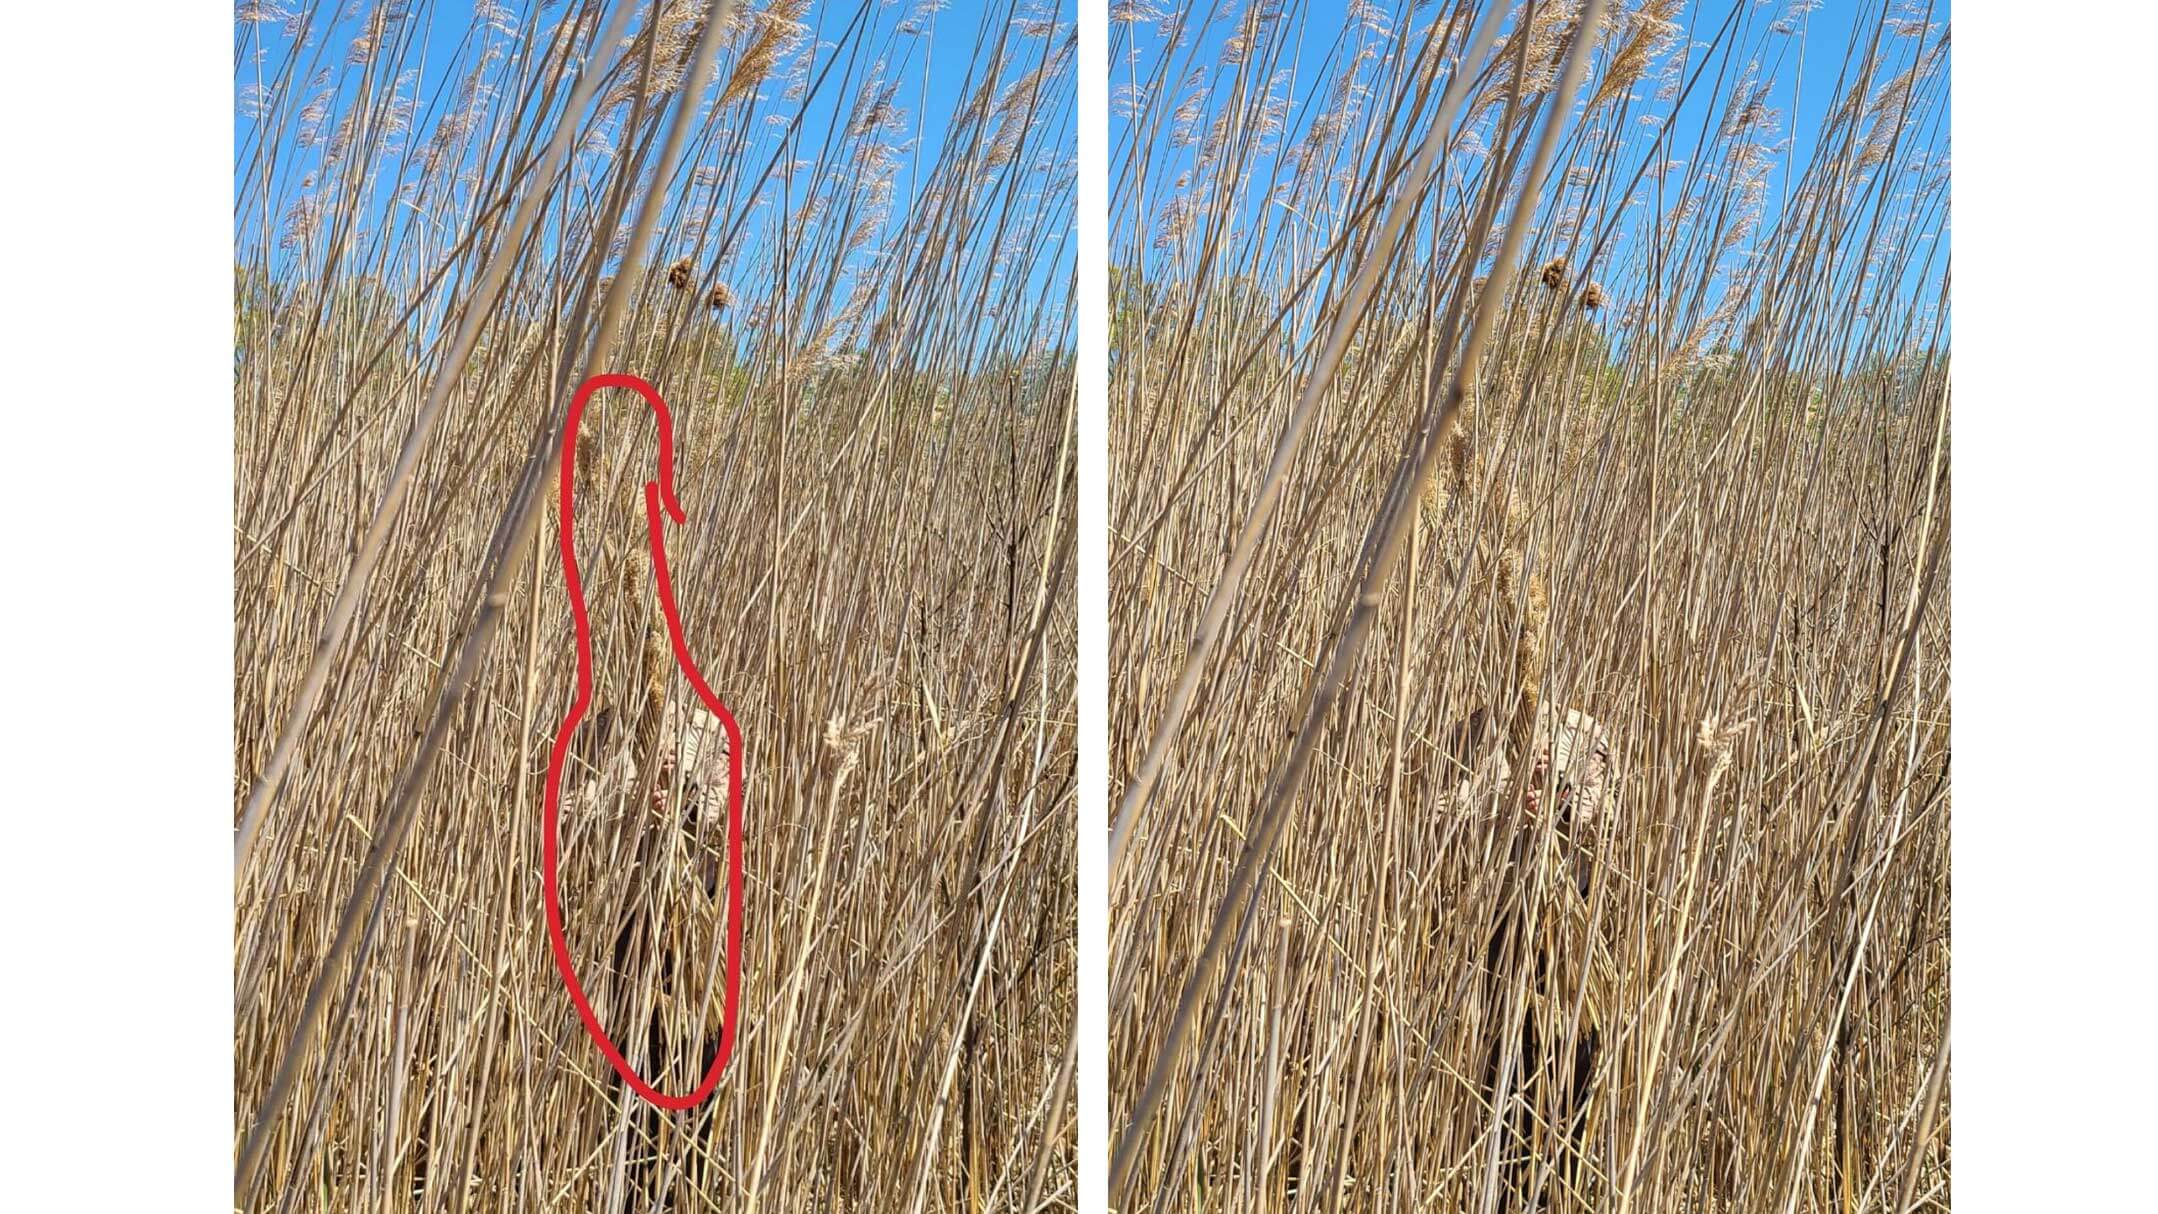
In these photos, I took some of the reeds and bound them tightly so that they won’t bend in the wind. Notice how all the other reeds are bowing more to the right, but mine are still perfectly vertical? This can be mitigated in two ways. One, you can break some of the reeds on your body so they become weaker and have a broken bending point. Or, the other option is that you loosen the bungee or tie-down so that the reeds can move more freely. You need to be careful though that they don’t fall, or that will create some serious movement that will surely catch the observer’s eye.
These photos also show color, contrast/value blended well, but the texture is non-existent. (at least for the top half of my body). The lower half of my body shows how much contrast there is between my grey pants and the tan environment.
Light (Reflecting, Sunlight and Shadow)
Light impacts colors and the value of colors. Some two tone animals, like cats, have darker backs and lighter bellies. That is because the sun lightens their darker back, and the shadow from their body darkens their lighter belly. This helps the animal blend and seem less two-dimensional. Ensure that you’re in the correct amount of sunlight to ensure you don’t contrast with your background.
As I said earlier in “Texture”, flat surfaces reflect light while rough surfaces seem to absorb it. Reflections from belt buckles, watches, or scopes can be seen over a mile away. Legend has it, Carlos Hathcock spotted his rival Vietnamese sniper because of the glint on his foes scope. Ensure that nothing on your body is reflective. A glint, or shine, is one of the easiest ways to attract an observer’s attention.
The largest subcategory of “light” is shadows! In sunlight, an object or man will cast a shadow that can attract an observer to his location. To a trained observer, shadows can be more revealing than the person or object itself. Where light is excessively bright, shadows will seem much blacker because the contrast will be extreme.
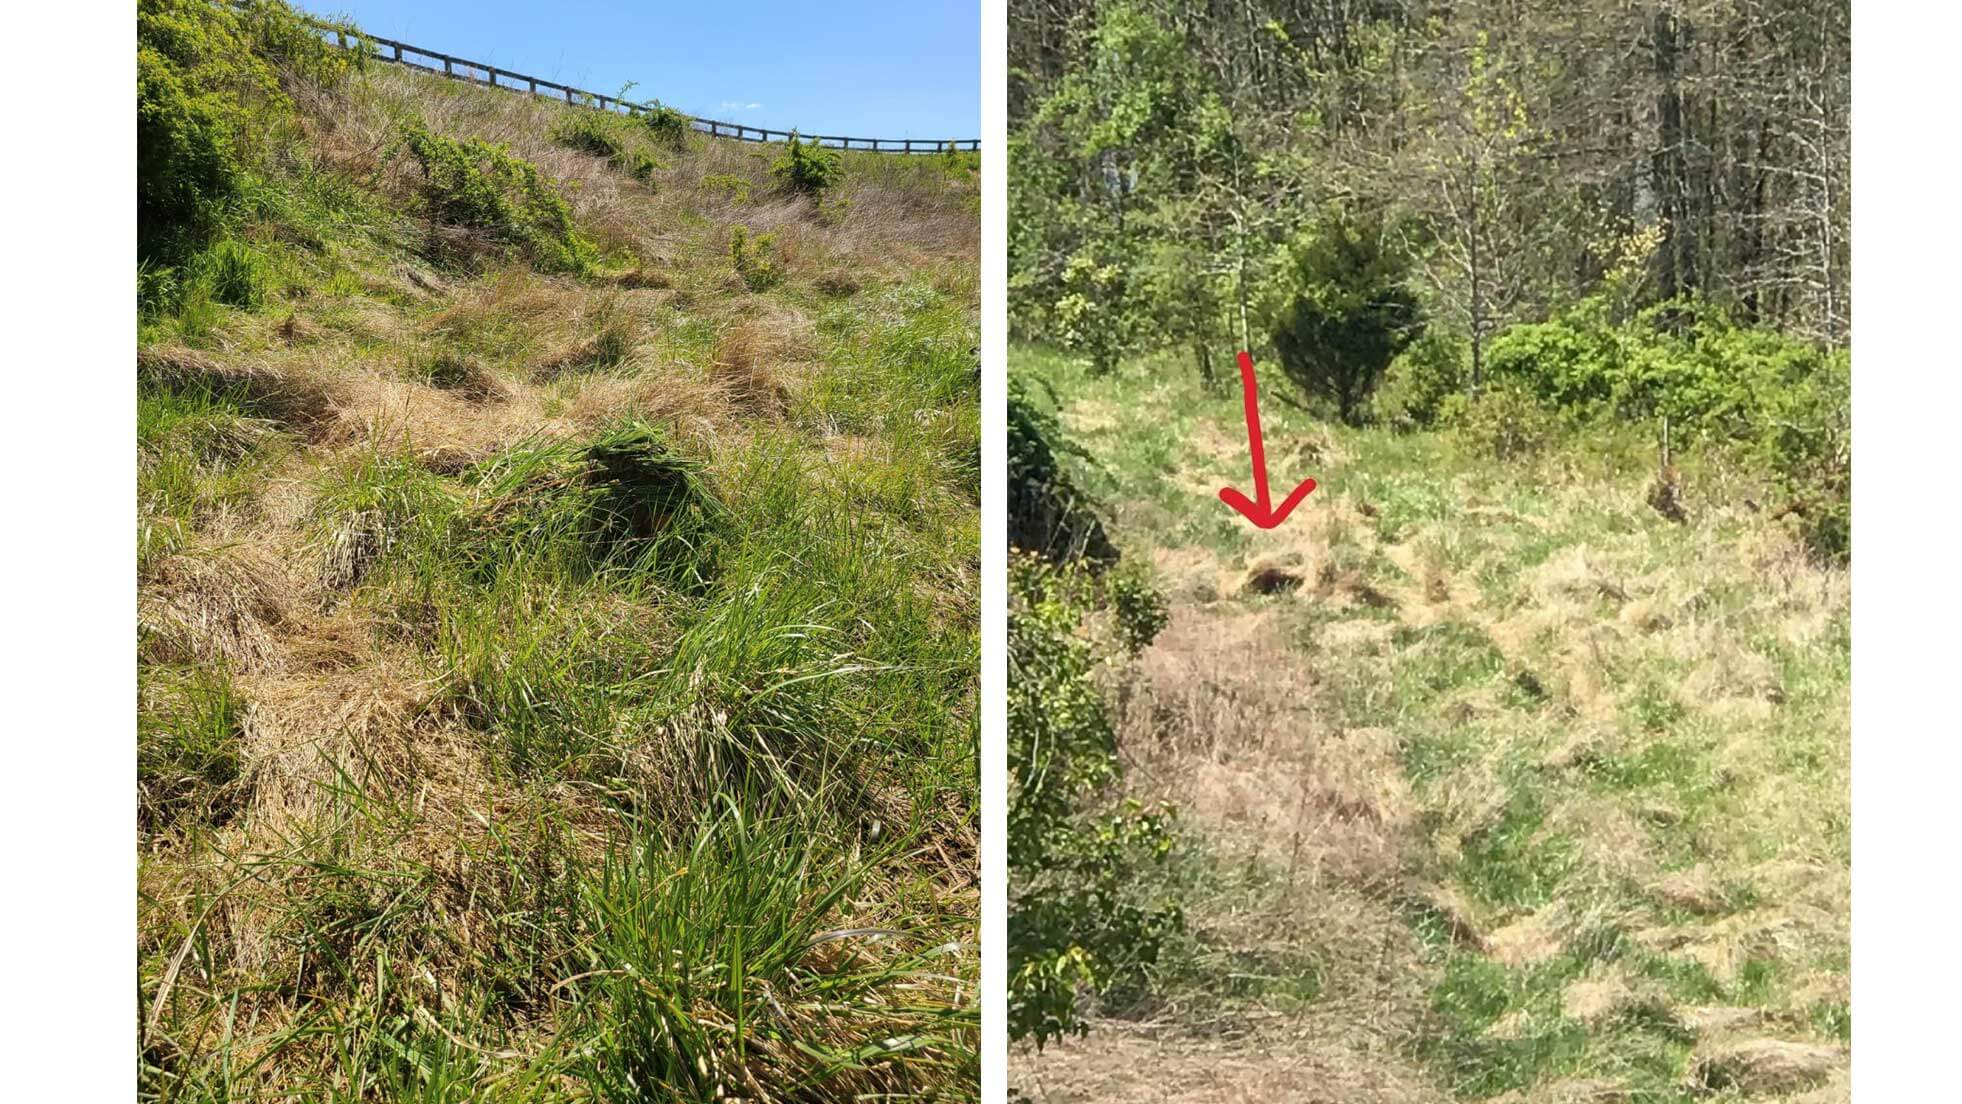
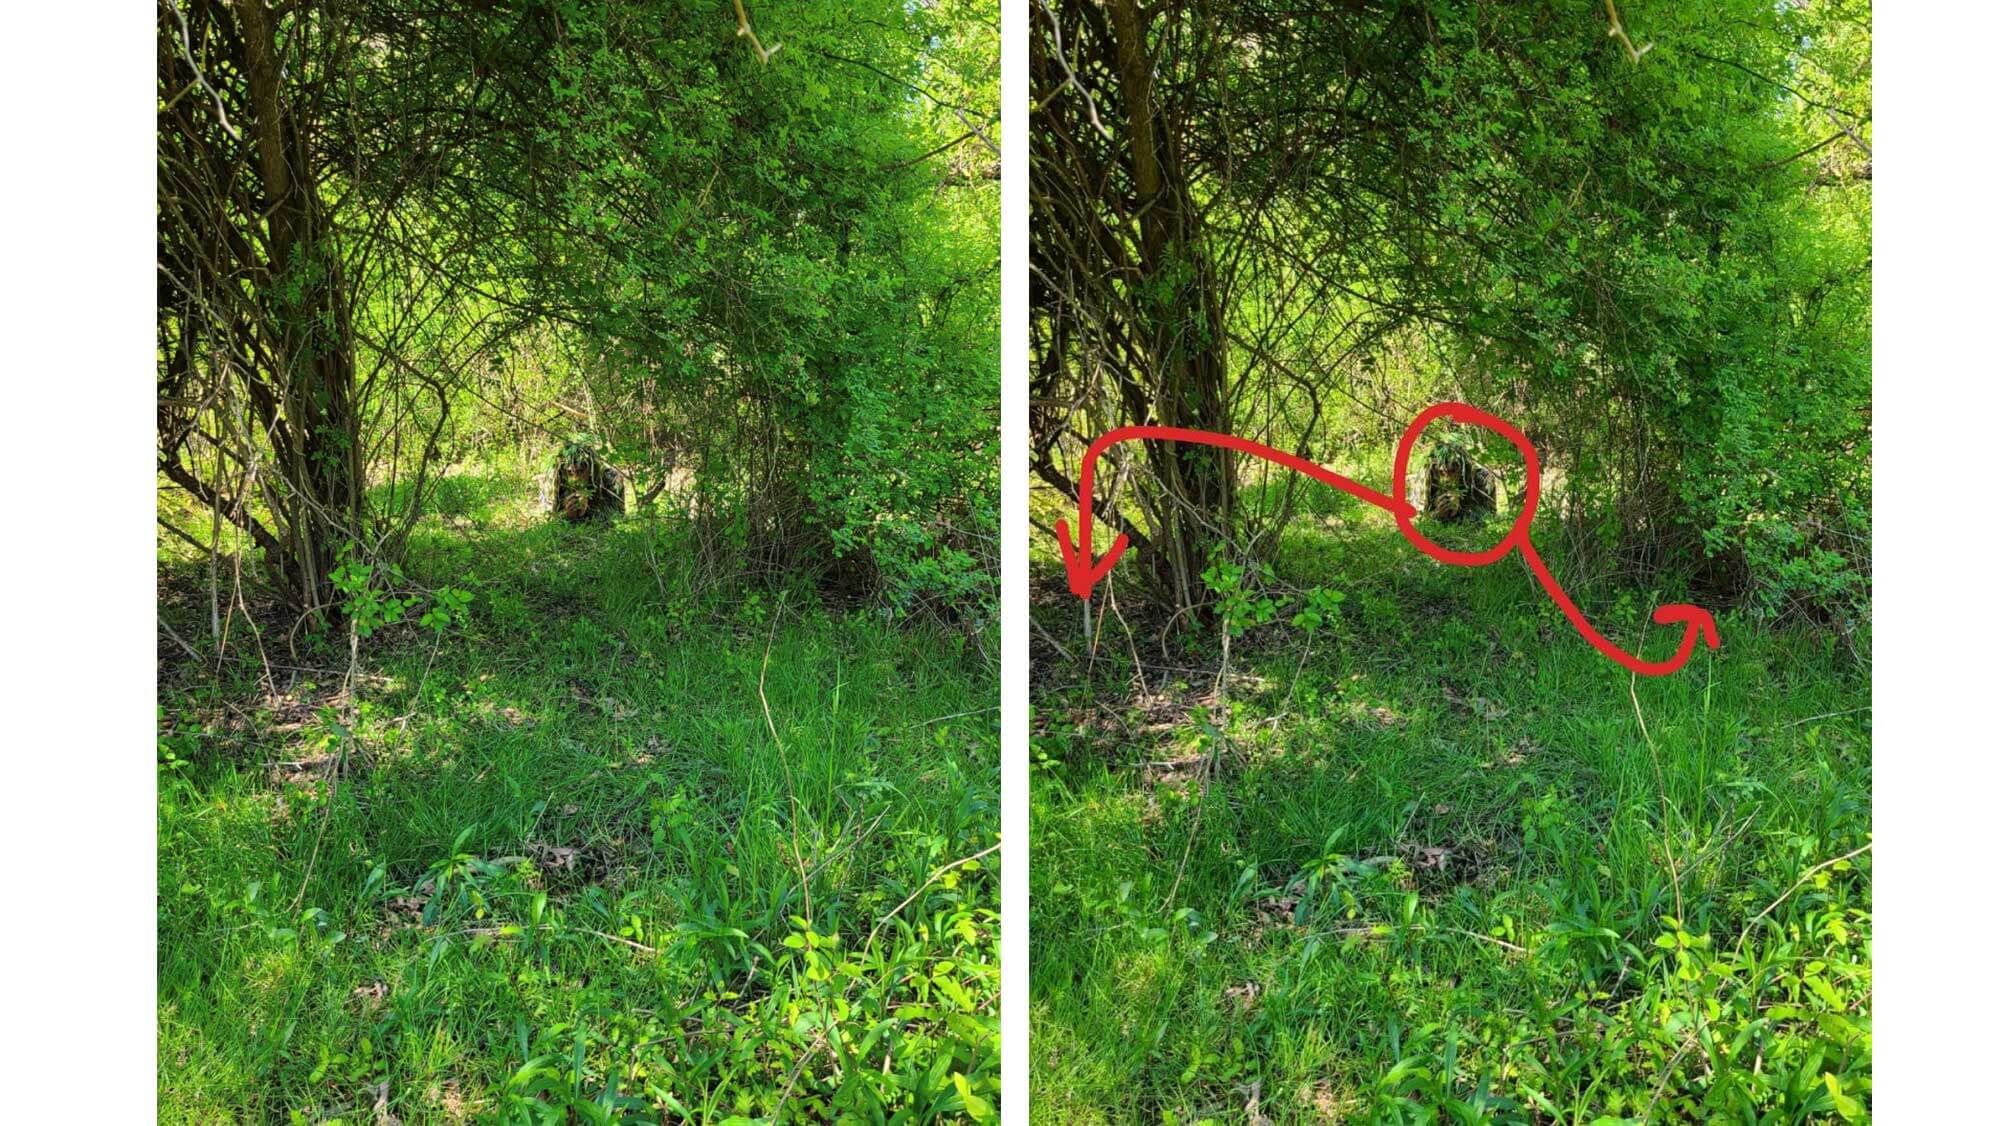
As I mentioned earlier in “color”, this picture (left) was originally taken to show improper use of shadow. This dark shadow, looks unnatural and is an anomaly in the baseline of the environment. This draws the observer’s eye toward this spot. The picture on the left was taken from about 12 feet away. The picture on the right was taken about 200 yards away. See how that dark shadow is such an anomaly in the baseline, that it draws your eye to it?
There is a simple way to break up this shadow. Apply more vegetation to the face. You don’t need your nose, cheeks, forehead, or chin to hide. You just need your eyes to see what’s going on around you. This shadow is caused by adding vegetation.
Positive & Negative Space
Positive Space is anything that takes up mass. This can be buildings, trees, bushes, vehicles, obstacles, etc. If possible at all, it is difficult for an observer to see through positive space. The human eye naturally moves from positive space to positive space, as the eye is attracted to these large objects. Similar to reading a book, it’s typical for an observer’s eye to move from positive space to positive space from left to right, far to near. It’s just first nature to the human while observing.
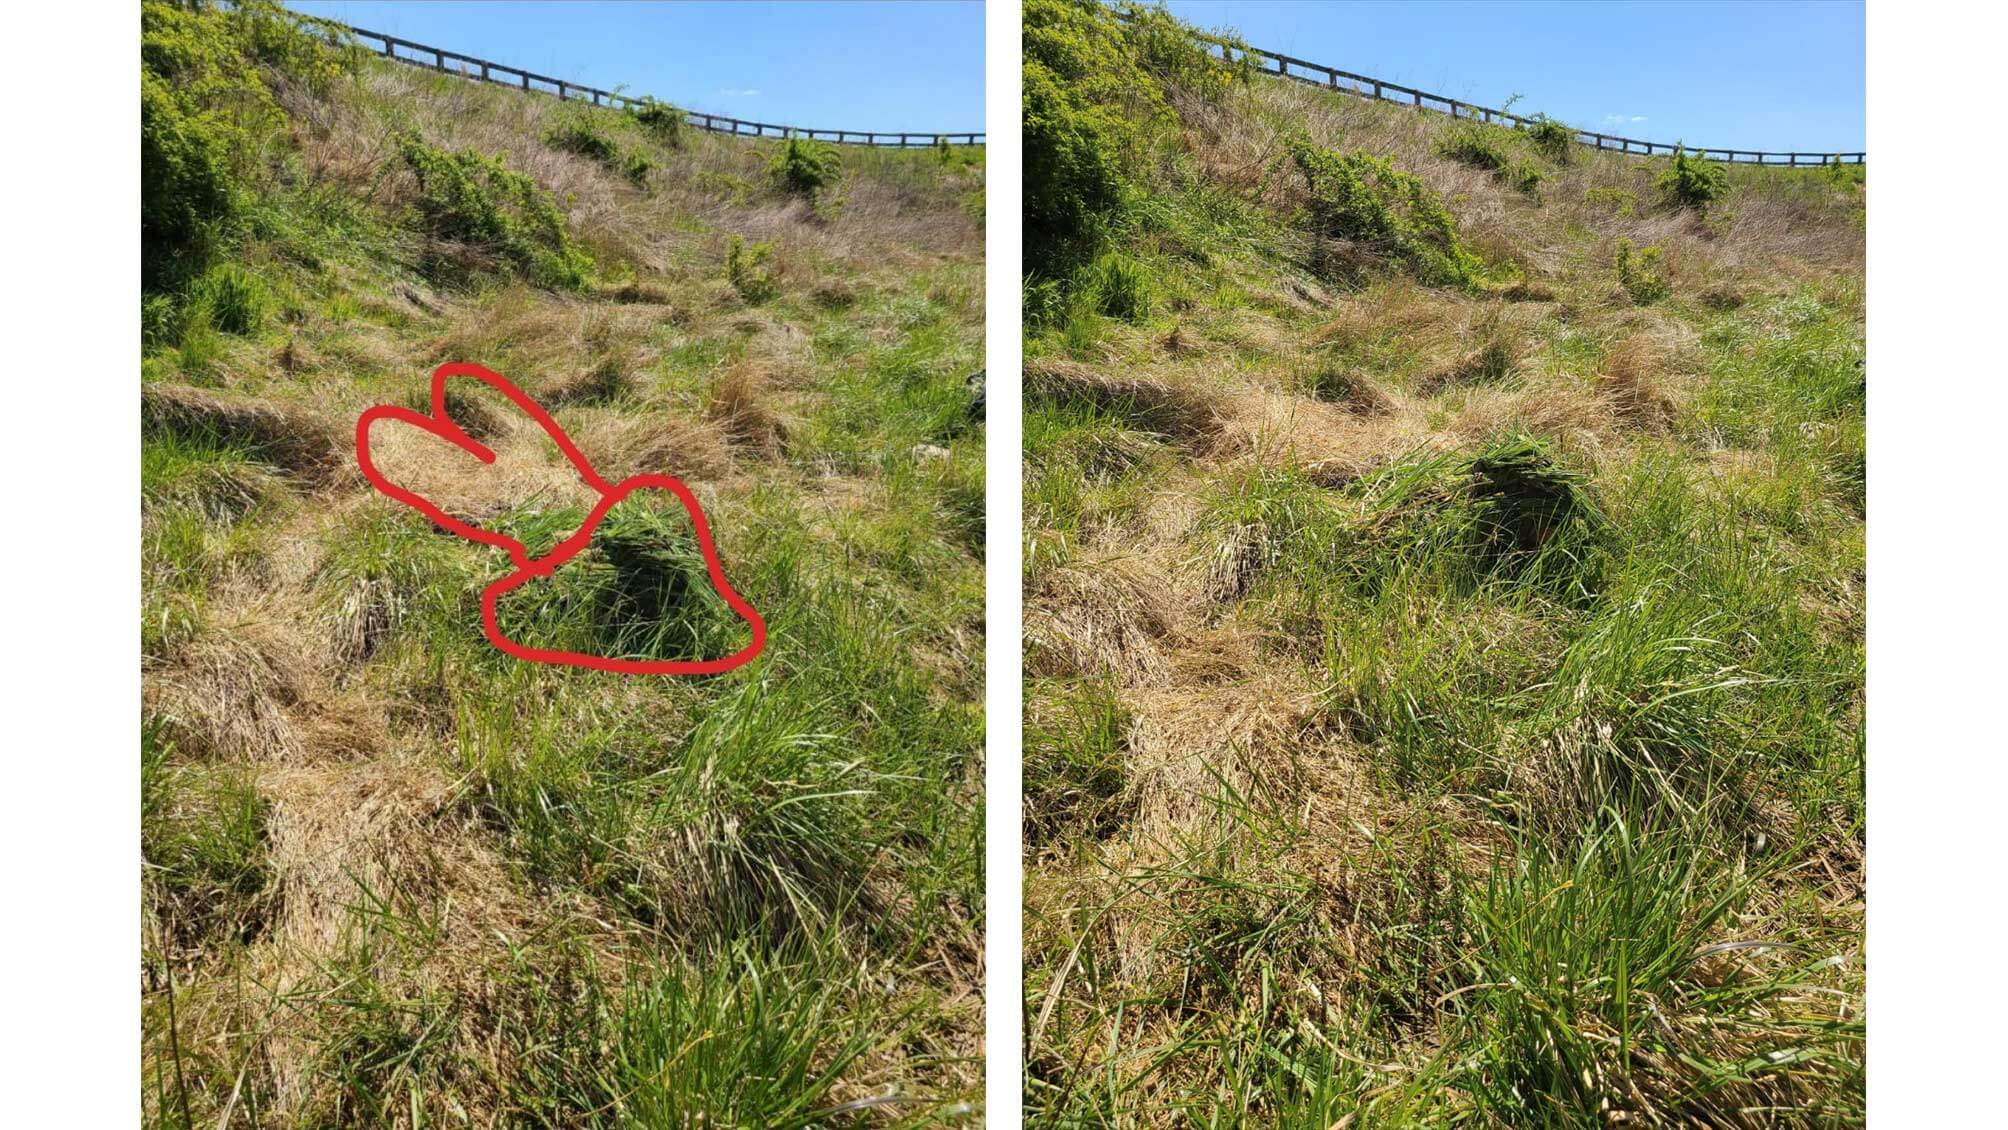
Negative Space is the space between the positive spaces. This background activity is easily overlooked by an untrained observer. The best camouflage resembles negative space. When observing, it is important to heavily scrutinize the negative space, that is where a trained sniper should be hiding. Scout Snipers will be operating in the negative spaces as much as possible.
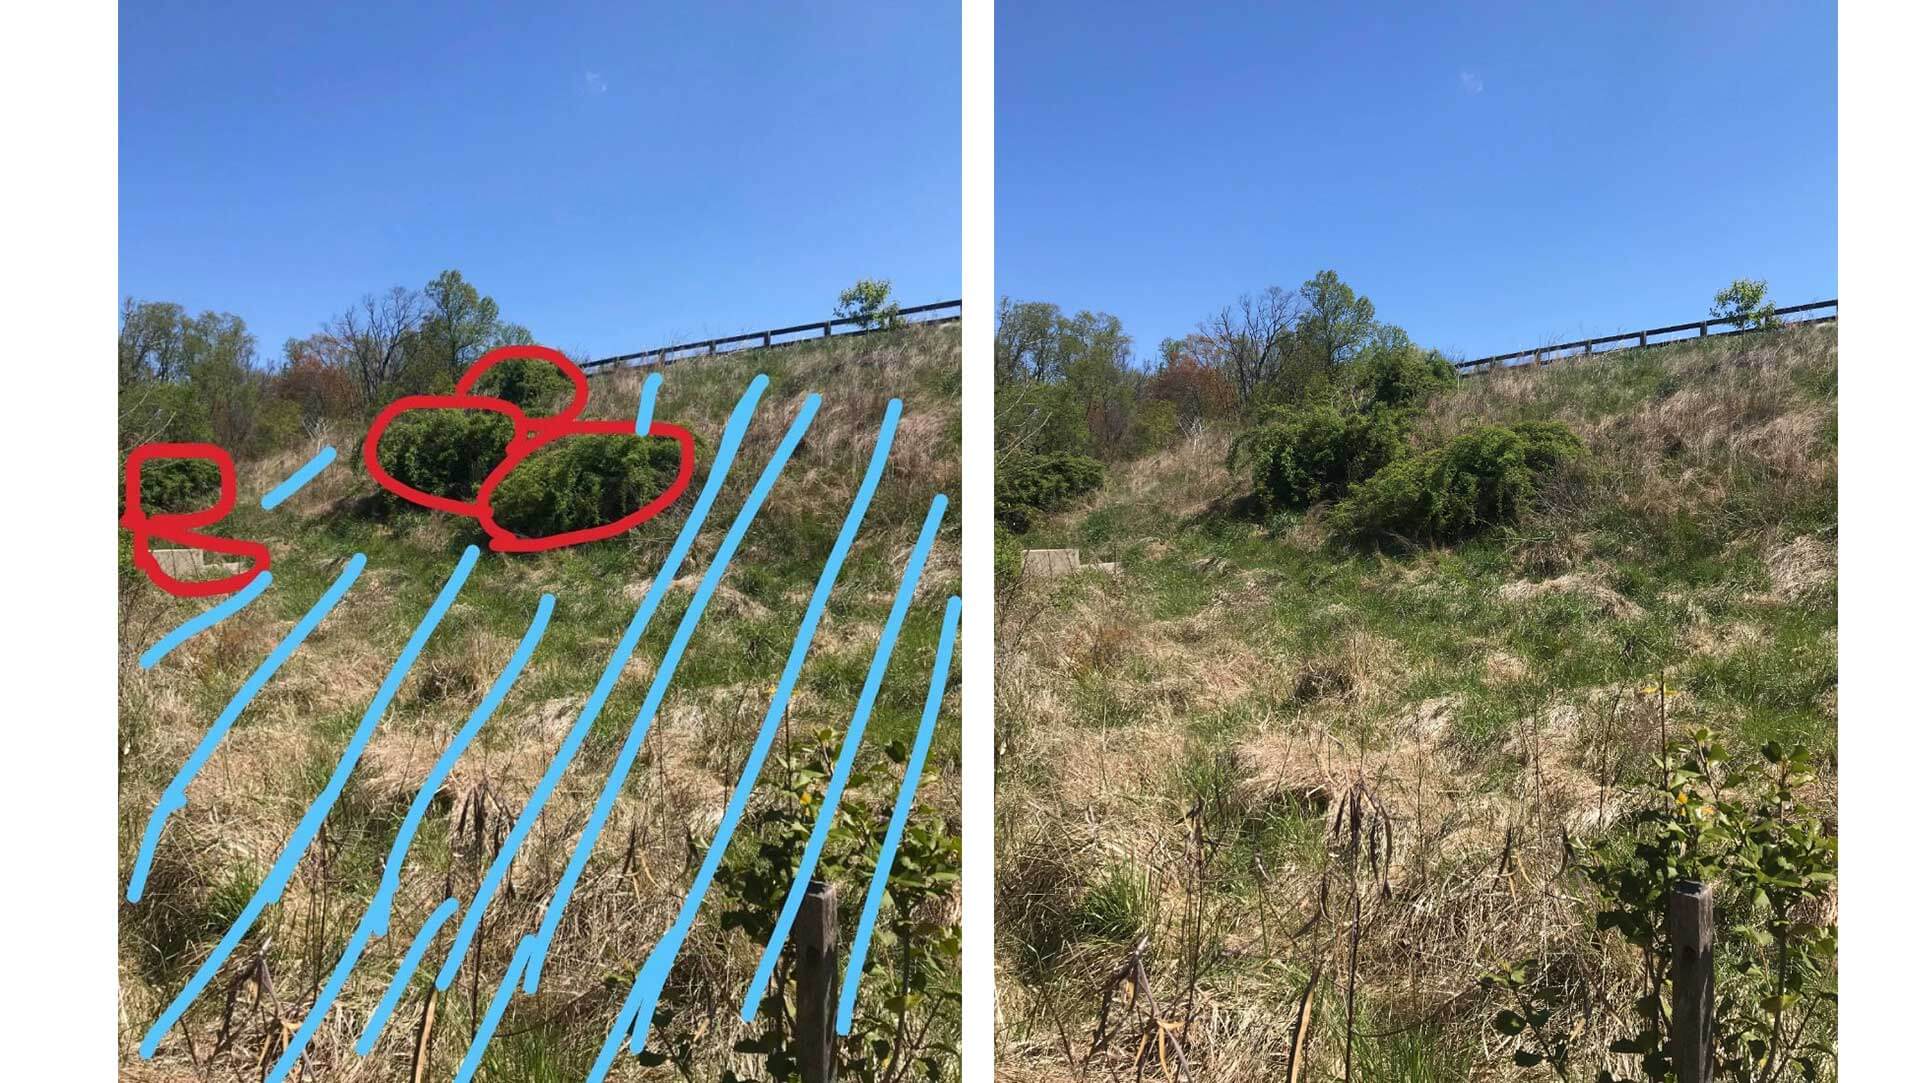
In these photos, I have circled the positive space in red and put blue lines through the negative space. Imagine if you are on patrol with the mission of scanning this 500 meter stretch for a possible sniper. You’re most likely going to be walking through this area, checking bushes and behind large objects. You’d be looking in the positive spaces. Now picture a sniper hiding somewhere in the low grass behind or offset from the positive space, you’d most likely walk right by or even over him while inspecting each of the bushes.
Movement
Movement is the easiest element of visual perception to grasp the concept of. Anything that moves catches your eye because movement is one of the biggest disturbances to a baseline. The human eye is strongly attracted to any movement. The sniper physically moving will attract the observer’s attention, and the sniper brushing against vegetation can cause the vegetation to move which can attract the observer’s attention.
There are two ways to hide movement. One is to move behind solid objects that obstruct the observer’s view, such as moving from tree to tree, and bush to bush. Another is to fold vegetation down towards the observer. Perpendicular movements are easier to see, whereas when you fold vegetation slowly towards the observer, it will appear to be “melting” so slowly that it is much more difficult to catch. Windy days are much more forgiving to movement, as movement is part of the baseline. On a day where there is no wind, bump a bush and it will be obvious to anyone, especially a trained observer.
SAFETY Considerations
As you can imagine ghillie suits can be very hot and increase the risk of overheating, especially when layers of vegetation are added. One of the only thing more dangerous than passing out from overheating is passing out from overheating while literally nobody can find you! I have seen this happen before and it can be deadly. I recommend never stalking alone. Consider using something like a find my phon” app so that you can be located in case of emergency.
Cold environments come with increased risk as well, as wet ghillie suits keep cold water trapped on your body. I have seen sniper candidates get confused due to oncoming hypothermia and began to stalk away from the course.
Frequently Asked Questions
A DIY Ghillie Suit is very much doable and a lot of people prefer making one themselves. It only needs a few things like camo netting and fabric along with some foliage and can be put together in a few steps as mentioned here.
Jute is one of the most crucial things to use while making a Ghillie Suit. Not only is it light but also holds strong in all conditions. Ideally, you will need anywhere between 4 to 8 pounds of jute.
A Ghillie Suit is definitely allowed while competing in paintball. You might want to consider wearing it in a colder season though, as ghillie suits are very good insulators and they trap all the heat emitted from your body.
A Ghillie Suit can be made of fabrics, camo netting, foliage, fibers/twines. You can use these to make a full body ghillie suit or something like a Poncho. Some people also prefer making only the top part of the ghillie suit and skip the bottoms.
Wrap up:
That does it for this guide, if you’re interested in picking up a prebuilt suit, we also have an article on the best ghillie suits here. Let us know if you have any comments or questions about this page below.
