This site contains affiliate links. As an Amazon Associate, I earn a commission from qualifying purchases at no extra cost to you. Full Disclosure Here.
A solid backpacking checklist will ensure you have a safe and enjoyable time in nature. Before we get into the list, I want to point out that there really is not a one size fits all gear list.
In the gear checklist below, I’ll include all of the items that make sense for an average backpacking trip and offer tips on how to adjust it for your particular trip.
Below the checklist, we’ll discuss exactly what gear you need for different durations and climates, as well as considerations you should make when buying gear and preparing for your trip.
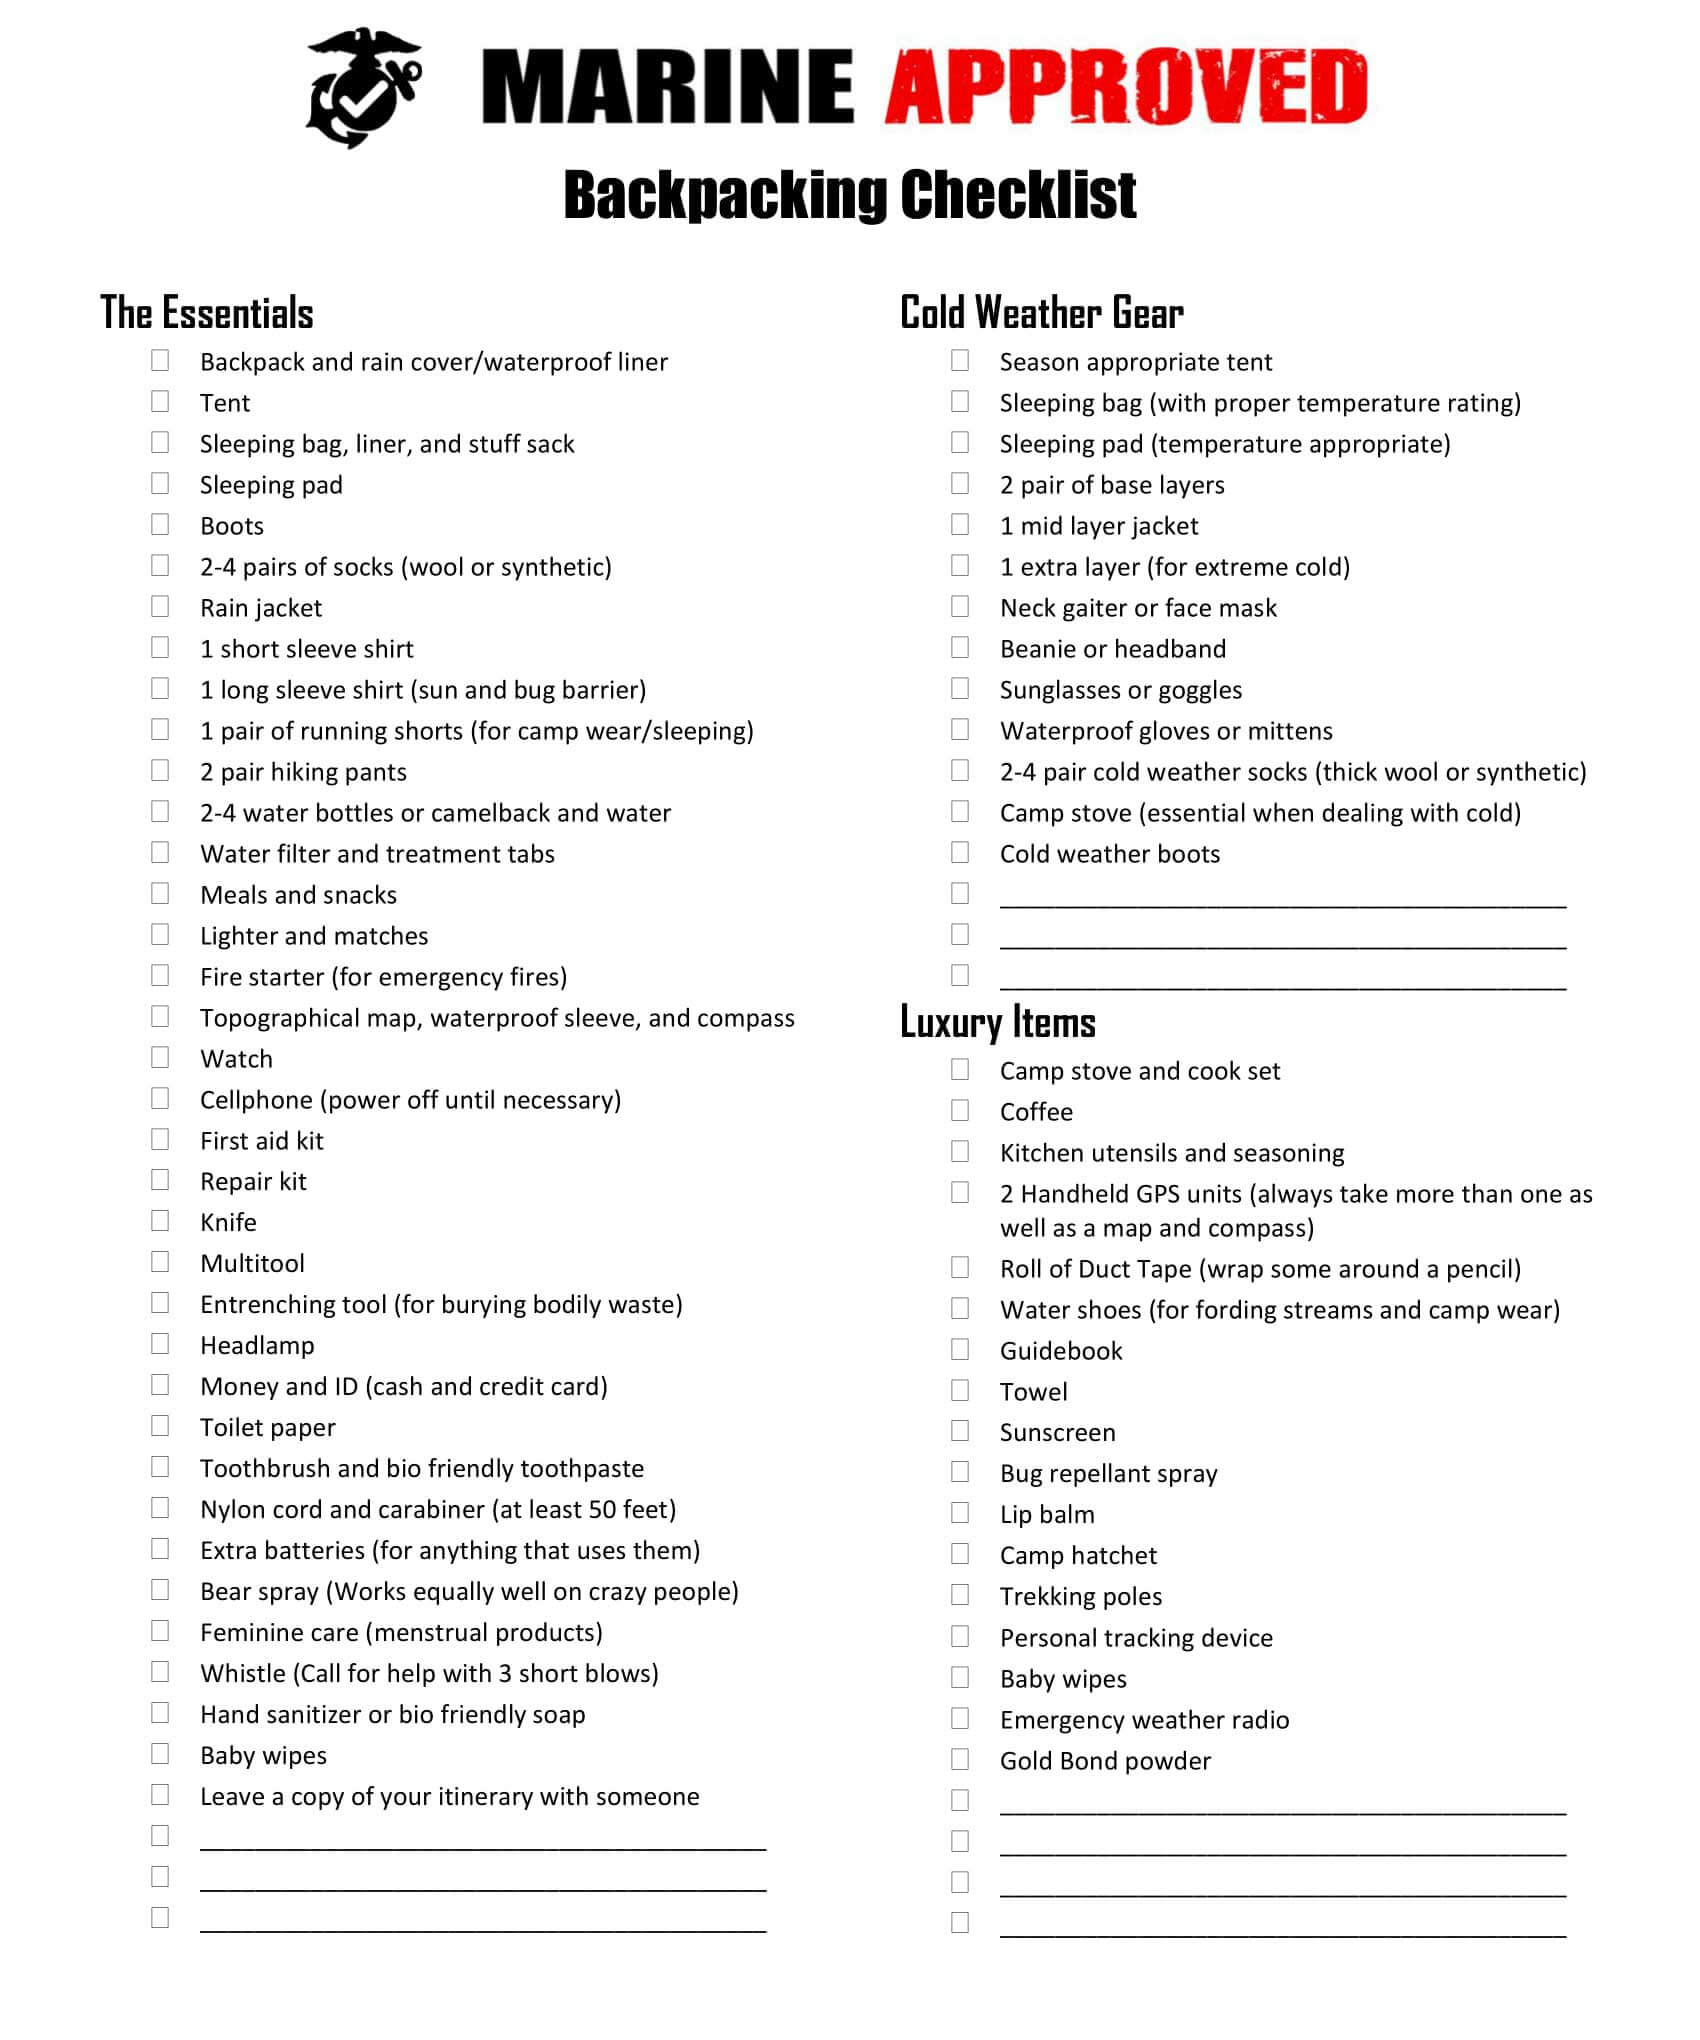
I turned the image below into a printable Backpacking Checklist PDF to make your gear prep a little easier. I recommend checking items off as you pack them. I also have a ton of other useful information in this guide so stick around and keep learning even after you have the checklist.
See the sections below for detailed overviews on how to select the right gear.
Here are the items you will need regardless of your trip length or weather conditions; they are the bare essentials for being relatively comfortable for an overnight hike. Everyone will have their own gear preferences after they gain some experience, but this list is a good baseline to build from.
Backpacking Gear Essentials
- Backpack and rain cover (or waterproof pack)
- Tent
- Sleeping bag and stuff sack
- Sleeping pad
- Hiking boots
- 2-4 pairs of socks (wool or synthetic)
- Rain jacket
- Rain pants
- 1 short sleeve shirt
- 1 long sleeve shirt (sun and bug barrier)
- 1 pair of running shorts (for camp wear/sleeping)
- 2 pair hiking pants
- 2-4 water bottles and water
- Water filter and treatment tabs
- Meals and snacks (read the section about food for best practices and food hacks)
- Lighter and matches
- Fire starter (for emergency fires)
- Topographical map, waterproof sleeve, and compass (Even if you know the trail)
- Watch
- Cellphone (power off until needed)
- First aid kit
- Repair kit
- Backpacking Knife or multitool
- Entrenching tool (for burying bodily waste)
- Headlamp
- Money and ID (cash, credit card, and government issued ID card)
- Toilet paper
- Toothbrush and bio-friendly toothpaste
- Nylon cord and carabiner (at least 50 feet)
- Extra batteries (for anything that uses them)
- Bear spray (Works equally well on crazy people as it does bears)
- Feminine care (menstrual products)
- Whistle (Call for help with 3 short blows)
- Hand sanitizer or bio-friendly soap
Cold Gear (Depending on Location)
Most cold gear can be added to the essentials list, but there are some considerations you must make on some of the larger pieces of gear when going from mild conditions to cold.
- Season appropriate tent
- Sleeping bag (with proper temperature rating)
- Sleeping pad (temperature appropriate)
- 2 pair of base layers
- 1 mid layer jacket (use a waterproof shell in the essentials list as the third layer)
- 1 extra layer (for extreme cold)
- Neck gaiter or face mask
- Beanie or headband
- Sunglasses or goggles
- Waterproof gloves or mittens
- 2-4 pair cold weather socks (thick wool or synthetic)
- Camp stove (essential when dealing with cold)
- Cold weather boots
Luxury Items List
These items aren’t necessary for short backpacking trips but can greatly enhance your enjoyment. When backpacking trip duration exceeds a couple of days, some of these items become necessary.
- Camp stove and cook set
- Coffee
- Kitchen utensils and seasoning
- Handheld GPS units (always take more than one as well as a map and compass)
- Roll of Duct Tape (wrap some around a pencil)
- Water shoes (for fording streams and camp wear)
- Guidebook
- Towel
- Sunscreen
- Bug repellant spray
- Lip balm
- Camp hatchet
- Trekking poles
- Personal tracking device
Here Are Some Basic Considerations for Your Checklist
No backpacking trip is the same. Even when you take the same gear along the same route, there are always variations you simply can’t plan for. In order to be most prepared, we must take into account the following conditions before we begin gathering our gear: Trip duration, food, water, and weather.
Trip Duration
While you should always have a set day that you expect to return, things don’t always go to plan. You may sprain your ankle, get pinned down by inclement weather, go off course, or decide to take a “zero” day (where you just chill all day), etc. The key takeaway is that you need to account for unexpected delays when planning your trip.
For short hikes of a day or two, you only need to pack extra food and be sure you locate a water source near your campsite. Backpacking trips over a week usually involve creating and following an itinerary so you cover certain distances each day so, by the time you run out of food, you will be at or close to your resupply point.
Packing for long duration trips are pretty straightforward. Use the essentials gear list and supplement with the items you need more of. If you are going for longer than a week you absolutely must have a couple of short duration trips under your belt. The short trips will help you hone in what you need and will help you decide what you need more of for long durations.
What Food to Pack
Back when I was a young kid, I loved eating MREs. I thought it was so cool to eat just like a real warrior. But after spending years of having only MREs to eat, I can’t stand the thought of eating another one. Thankfully, there is an enormous variety of freeze-dried meals of such high quality that they rival some people’s own home cooking. If you don’t have the budget for freeze-dried meals, go to your local grocery store and buy food that doesn’t need to be refrigerated.
Pack enough food to last for your trip and then add a day’s worth of extra food. If you are doing an extended hike, use the same method but plan well for how you will resupply. If you have an itinerary and want to hike a set number of miles per day, you might want to take two extra days’ worth of food just in case you don’t make your mile goals. Before going long, you should have a good idea of how many miles a day are reasonable for you given certain terrain.
It is good practice to have several extra meals.
How to Pack Food
Before you start packing all of your meals and snacks, think about where you are going to have to put all the trash. It is a great practice to buy a bunch of Ziploc bags beforehand. While you are packing, open up all of your food and add the individual meals to the Ziploc bags. Discard all of the wrappers and trash.
Snacks can be combined into one Ziploc bag a day. This method works great because it eliminates a lot of waste, you can reuse bags for other things, and It helps you monitor how much you are eating.
When to Eat
When packing for a backpacking trip always remember you will have more of a need for calories than you would in comparison to a normal day at the office. Take this into account when you gather your food. I like to have 4 or 5 medium sized meals spaced out every 2 to 3 hours with snacks in between. It may seem like a lot but trust me, it is necessary to eat this way when you are burning lots of calories.
The biggest takeaway is to eat and drink early and often. Don’t wait until you get hungry or thirsty. By that time, you are already behind your body’s needs.
Eating the Wrong Way
I first learned the importance of fueling properly when I began doing long distance triathlons. If you have ever seen or done a triathlon you know that athletes are always eating or drinking something while racing.
The first time I rode my bike more than 100 miles I tried to eat an energy bar or drink an electrolyte mix every hour. Even though I was fit and more than able to ride that distance, I didn’t take on enough calories so I hit a wall and my body just couldn’t go any longer.
I ended up having to stop in a sketchy part of town at a Dollar General to buy Dill Pickle chips and a Red Bull. I devoured my treats on the wet and greasy concrete curb before jumping back on my bike and finishing the route with replenished energy stores.
If this happens to you on a hike, it could take a while to get going again, and if you are on a long hike with many miles to cover, you are going to start falling behind your itinerary. Then you’ll run out of food before you get to your resupply point.
Eating and Drinking the Right Way
Start thinking of hiking as an endurance sport and control your nutrition. Eat and drink often and in small amounts. Keep those calories and electrolytes in your body. Don’t wait until you are hungry to snack. Shoot for something like a high calorie energy bar or trail mix every hour and larger meals every 2 to 3 hours.
Be sure to drink water frequently and in small amounts. If you have to gorge on water, it means you weren’t hydrating at the right rate. We have all felt that sloshing when we drink too much and you don’t want that on the trail. It is also a great idea to carry electrolyte tablets to drop in your water, especially in hot weather.
Water Considerations
Water is the absolute top priority when you are isolated from civilization for an extended period of time. The average person can survive more than 3 weeks without any food, but your chances of surviving without water are only several days. And that is when you are in a mild climate with a very low workload. If you are in a very hot and dry environment, it could take hours to succumb to dehydration.
Just make sure you plan your trip around water. Take enough water with you to get you to your next water source. Take more than you expect you will drink before getting there. If you get off course and have no way to call for help, the first thing you need to do is find a water source.
Weather Considerations
Raise your hand if you have gone hiking without any rain gear because the forecast was clear skies only to end up soaking wet and shivering. I’ll put both of my hands back down so I can continue writing this. It is highly likely that almost everyone has had this happen to them at least once.
Even if there is no rain in the forecast, take some rain gear. You probably don’t need to go crazy and pack for a monsoon, but it is good practice to at least take your rain fly and waterproof shell (jacket).
Same thing goes for those weird temperature swings. Don’t leave the sleeping bag at home when the temperature is only supposed to dip down to 65. It could go further, and you could end up shivering all night, which is really only a comfort thing unless the temperature really drops, and you have no way to keep your body temp up. Hardcore backpackers live by the saying “travel light, freeze at night”.
Outside of the normal precautions to take for unexpected weather of the season you are backpacking in, make sure you get an accurate forecast for inclement weather. You don’t want to be caught in the woods with a tarp tent during a two-day long storm caused by a hurricane 200 miles away.
Climate Considerations
It isn’t hard to go backpacking in a climate where you grew up. You should already be familiar with a certain area’s weather patterns, wildlife, culture, etc. But once you travel somewhere to go backpacking, things can change and create a dangerous situation if you haven’t done your research. Each climate has different requirements for gear and must be accounted for ahead of time.
Below are just a few examples. If you are planning to backpack somewhere you haven’t been, always do exhaustive research and talk to guides or people who have gone where you plan to go.
Tropics
The tropics are hot, humid, and for the most part, have diverse and dangerous wildlife that must be considered.
In the rainforests of South America, high amounts of rainfall can create flash floods that can sweep away you in your tent in the middle of the night. Be mindful where you choose your camp, don’t count on being able to make a fire, and make sure you avoid areas known for bandits and criminal activity.
Water is in abundance so you must have a good plan for keeping things dry that need to be dry but plan on spending much of your time soaked.
Dry Climates
Dry climates, like the Midwest states in the U.S., have very low humidity in the air and little precipitation and is home to four major deserts. The main concern with hiking in the desert is water and heat. Be absolutely certain you plan out where your water stops will be.
If possible, call someone and find out if water is available if the spot is seasonal. This is where it helps to talk to local guides and other hikers. Take a water filter. You might have no choice to drink from a dirty pool of water or livestock reservoir. Know the signs of dehydration and drink small amounts of water even when you aren’t thirsty.
In high heat environments make sure you take on electrolytes as well. Drinking too much water can result in hyponatremia which is when you dilute your blood too much and is just as serious as extreme dehydration. Both can result in death if untreated.
Try to beat the heat by starting early and going late. Spend the hottest part of the day resting in the shade.
Know what wildlife you can expect to see and where they are most likely to be. Desert animals have a rough life and have adapted well and as a result, are quite dangerous to humans.
The weather in the desert can change in minutes from extreme heat to flash floods. Always set camp in a safe place. Also, account for how cold the desert gets at night and pack accordingly.
Temperate Environments
Most of the eastern half of the United States is considered a temperate climate (except for the northern most states). Population density is very high in this region in the U.S. so seek to understand local rules and customs of the areas you will be backpacking.
You can usually get away with taking less gear than you would for a dry, tropic, or polar climate. Especially if you hike during the summer season.
Continental
This region has warm to cool summers and very cold winters, like much of Canada and the border states of the U.S.
Summer backpacking can be very pleasant but still require gear for cool nights. Wildlife such as moose, wolves, and bears are things to be very aware of. Always take the proper precautions and travel with a weapon or deterrent. Again, know the area and how the animals act and where they are most likely to be.
Polar
Lots and lots of snow and Ice. Pretty straight forward here. An unlimited access to frozen water but depending on where you go you could be without firewood to melt it.
Make sure you pack tons of fuel for your camp stove and many backup sources for fire. Drinking plenty of fluids in a climate like this is extremely important. You can dehydrate very quickly and not really know it until it is too late.
Check your area for known wildlife habits as well.
Just about all the gear you take to a polar region will need to be specifically designed for use there. Don’t try to make something work when it isn’t designed for it.
Gear Considerations
Not all gear is created equally so there are some things to consider when making a gear purchase for the first, second, or 20th time. Knowing the climate you intend to backpack in will get you on the right path, but in a broad sense, there are similarities to look for regardless of where you are going.
Backpack Sizing
It just wouldn’t be called backpacking without the backpack. Just about anyone you ask will tell you it is the most important piece of gear you can buy. Having the wrong backpack can not only cause you horrible pain but can also be totally wrong for the type of backpacking you intend on doing. So, what do you look for in a backpack?
The first thing you should do is decide on the types of trips you are going to take. Most backpacks are separated into three categories: weekend, multiday, and extended. Sometimes the length of day type of category is misleading. You can easily take a weekend pack on a month-long trek just like you can take an 80-liter pack on a day hike.
So, I have my own way of thinking about the different categories that might help you. You have your compact car, an SUV, and finally a crew cab power stroke diesel truck. This analogy makes it pretty easy to understand what type of features you get and it really works for helping people understand the different sizes.
If you’re wondering, a Daypack falls into the Mazda Miata category of backpacks.
One important note before going further. Do not just buy a backpack because it looks awesome and has a ton of features. Get fitted or at the very least, measure your torso length defined by the backpack manufacturer and follow their recommended models for your torso length. If you make the mistake of getting one that is ill-sized, you will not enjoy your purchase.
Weekend (30-50 liters)
Weekend packs are usually 30-50 liters and are perfect for short duration trips. You shouldn’t have much trouble getting everything you need packed for a 1-3-night trip. If you are a minimalist and like to stay light for those thru hikes, these are a perfect size for you as well. But you will definitely be cutting out a lot of gear if you do this. It’s not a problem for the hardcore though.
Multiday (50-70 liters)
The multiday pack would be the best all-around backpack to choose. They usually come in the range of 50- 70 liters which is plenty of space unless you like living it up on the trail or have small children whose clothes end up in mommy and daddy’s pack.
If you are having trouble deciding on the perfect backpack, buy a multiday. There isn’t any reason to go big unless you have to. And if you want to take a couple of luxury items to keep your significant other happy, you’ll have the option.
Extended (70+ liters)
This is the big boy. If you don’t mind the weight and like to carry a ton of gear, this is the pack for you. If you are looking to do some backpacking in the continental and polar regions, this size will allow you to easily store all your warm gear, sleeping bag, and extra tent poles.
I am a big fan of these sized packs but having a large ruck isn’t something to buy to pump your ego. Get one only if you need one and are properly prepared to be a pack mule.
Secondary Features
After getting the right size pack for the job, you need to look at the features. The first thing I want is a rain cover for the pack unless it is already waterproof. Depending on the gear you are taking and the type of backpacking you are doing, you will have specific needs for features.
Tent Considerations
Tents can be like sleeping in a palace or like squeezing into a coffin. So, there are a lot of choices. First, you’ll want to decide what capacity tent you want. A 2-person tent is the most popular choice because it isn’t too large to take when you are going solo and if you have more than 2 people, you can sleep 3 people comfortably in some models.
I would suggest trying to find the tent you want on display somewhere or reading a thorough review before just ordering one. Tent descriptions can be misleading, so it is nice to know how big or small it actually feels with you in it
Season rating is very important as well. You can’t go wrong with a 3-season tent. Obviously, these tents are rated for three distinct seasons, but they can handle 4 seasons if you are staying in a temperate climate. They will hold up to light to moderate snow as well as muggy summertime rain.
Just make sure you buy an extended season tent for the trip to the arctic you have planned. Extended season tents are made to withstand high winds and brutal snowstorms.
Clothing Considerations
Rule number 1 is to stay away from cotton. Cotton is great at soaking up water and taking forever to dry. If you get wet, you will probably stay wet. Go with wool or synthetics for your clothing.
For trips of any length, you don’t want to weigh yourself down with too much clothing. Wear one pair of climate appropriate apparel and pack a complete set. When the one you are wearing gets nasty, rinse it off in the stream and hang it to dry. This way, you can cycle your clothing and stay relatively clean no matter the duration of your trip.
For cold weather, dress in layers. Wear a base layer, a t-shirt, a light jacket, a coat, a rain shell, etc. You want to be able to shed your clothing gradually as you warm up. Always aim to stay a little cooler to keep yourself from sweating.
When it comes to waterproofing, one of the best gear decisions is a simple waterproof shell. The waterproof shell shouldn’t have any insulation which makes it perfect for slipping over anything you are wearing. The last thing you want is a hot waterproof jacket when you are trying to keep the rain from getting you wet.
It is also a good idea to treat your clothing with Permethrin bug repellant pre-trip.
Footwear Considerations
Don’t be the guy who tries to summit a snowy mountain in standard issue military boots. You will end up with frozen feet very quickly. Just like everything else on this list, footwear needs to be purchased specifically for the trail environment you will be putting them in. If you will mostly be on easy terrain in a dry and hot place, you might elect for a pair of trail running shoes.
On the other hand, climbing in the craggy mountains with lots of loose rocks will call for a boot with more support and durability. Extreme winter conditions call for boots that will keep your feet from freezing while staying dry.
Having a pair of cheap water shoes is always a good idea. You can slip them on when you have to cross a stream instead of going barefoot or worse, crossing them in your primary boots.
Sleeping Gear
Sleeping Bag
Sleeping bags have come a long way in a short time. My first sleeping bag was an Extreme Cold Military mummy bag. That thing was super warm but man, you could throw it at someone and if it caught them in the face, it would take them straight to the ground. New sleeping bags keep you just as warm but can blow away in light wind.
Focus on the temperature rating. Make sure you get a bag that is rated to keep you warm 10 to 20 degrees below what the lowest temperature you expect to experience. This will give you some room for error. It is better to be too warm than too cold; you just don’t want to be hot when it is freezing outside so don’t pick the warmest bag you can find unless it makes sense for where you will be sleeping.
Weight is definitely something that can get out of control with bags. I’ve seen some pretty cool bags that are made for two full grown adults. These are perfect for when my wife and I go for a hike since we share body heat, we don’t need the lower temperature rating and can save weight and my wife doesn’t have to carry a bag. Joke’s on me, I guess.
One way to save weight is to get the tightest fitting bag you can find. Don’t get a rectangular shaped bag, go with a mummy stuffed with synthetic filing to get the most weight savings.
Sleeping Pads
Anyone could make a good argument that sleeping pads are more important to have than a sleeping bag. While this may or may not be true, sleeping pads are necessary in most climates. Sleeping pads are great for getting a more comfortable rest but the main reason they are so good to have is they insulate your body from the ground.
No matter how thick your sleeping bag is, your body heat will conduct into the ground much faster than it does into the air. There is some pretty cool science that goes into this, but we will save that for another day. For now, just understand that no matter what, the ground is your biggest enemy when you are trying to stay warm.
A nice sleeping mat puts an insulation barrier between us, so the heat isn’t transferred as fast. We still lose heat to the ground, but the better the mat, the slower the ground gets our precious warmth.
Sleeping pads usually come in three different types: air, closed cell foam, and self-inflating. Air pads are fully inflatable. If you get a puncture, you end up on the ground in the middle of the night. Closed cell foam pads are very light but aren’t that comfortable and they are super bulky.
My favorite pad type is the self-inflating type. They have foam inside. When the mat is rolled uptight, the air escapes and you close a valve. When you open the valve, the foam begins to expand. When it expands, air is drawn into the pad, so you end up with a hybrid pad.
Cooking Gear
What luxury a camp stove is. When I camped as a kid, we always had a fire. When I joined the Marine Corps, I realized warriors didn’t use fire to heat food or their own bodies. So, when we were in the field on a clear night with snow covering the ground, I really missed the greatness of fire. All we could do was complain about our misfortune.
Fire is one of the most uplifting and motivating things you can do when you are in the bush. But sometimes you are limited by regulations on making fire or just don’t want to make one when all you want is to eat warm food and hit the sack.
This is where camp stoves shine. There are different types of camp stoves but for the most part, you’ll want one for backpacking. Carrying a full-size range in your backpack isn’t what most of us need.
Canister stoves are my go-to choice. The fuel tanks are screw on and self-seal, so you can take everything apart to make packing easier. They are also very low maintenance. I have a cheap Coleman that has been used for more than 10 years with no problem.
You don’t really need one with a ton of features but go all out if you want to. Having a hot meal at the end of the day is one of my favorite things about backpacking.
Water Filters
Water filters are critical for getting water that is suitable to drink. Without them, you either have to boil your water or risk getting seriously sick. Make sure you find a filter or purifier that will suit your needs best. Understand that filters and purifiers remove different sized particles so don’t get them confused when making your purchase.
You should always have the option of replacing your filter cartridge so take an extra or two. It is also a good practice to take a pre-filter. A pre-filter will remove sediment and large particles so the filtration process doesn’t clog or tax the main filter too much.
Water Tablets
Water treatment tablets should be part of your list every time you go backpacking. They are extremely cheap and can play backup when your filter breaks. The most effective tablets are iodine or chlorine-based and kill almost all those little floaties that will make you sick.
The drawback is they take time to treat the water. And if it is very cold, the treatment process can take hours. If you are going to wait that long, just boil the water.
Ultraviolet Light Purifiers
If the water you want to treat is clear, then a UV light pen can neutralize your water in a minute or less. All you have to do is turn it on and stir your water until it gives you the all clear. They do take batteries and don’t work well with cloudy water. But it is another tool we can throw in the toolbox.
Self Defense Gear
Depending on where you are or where you are going, you might consider taking a sidearm or rifle. Trekking through the Alaskan wilderness isn’t somewhere I would go without a firearm. Be sure to check if it is okay to have one where you are planning to backpack. Having a concealed carry permit will go a long way but always check local laws.
If you can’t take a firearm, use a good sharp fixed blade knife and bear spray as your defense weapons.
Preparation
Planning is everything. A short one-day adventure can turn into a week-long nightmare if not planned properly. As your trip duration lengthens, planning becomes critical to survival. You need to know exactly when you will run out of food and where to resupply.
Knowing is sometimes only half the battle though. For long hikes, you can have everything perfectly planned but totally blow your itinerary because you overestimated your physical abilities. This is all too common even amongst very fit individuals.
Take long trips seriously and train for them. Start small but you want to eventually be able to hike for a day under the same conditions you would during your trip without being destroyed at the end of the “dry run”.
Trekking Poles
Some people are fine without trekking poles, others have to have them. But trekking poles can really help you reduce the workload on your legs, help you rest, check the ground in front of you, and even help set up a tarp tent. There are many benefits to using trekking poles so give them a try if you haven’t already. Take them on a day hike or practice run and decide if they are for you or not.
Wrapping Up
Backpacking is one of the greatest ways to experience nature and have a great time. Be sure you understand everything about each item in your pack. Lay all your gear out on the floor and check off items one at a time as you add them to your pack. Be sure to print off the list to take with you to the gear store and to help you pack.

Sergeant Mitchell,
Two suggestions for the list:
A hat (brimmed to accommodate backpack).
Perhaps your First Aid already included this; Moleskin.